
Leveling resources by adding resources in MS Project Pro
Contents:
- Leveling the resource by adding resources in MS Project Pro
- Leveling group resources by adding resources in MS Project Pro
- Chat
Leveling the resource by adding resources in MS Project Pro
After assigning work resources to MS Project Pro, calculate the level of resource loading. MS Project Pro compares the resource load level with its availability.
Steps to level the resource by adding resources in MS Project Pro:
- Open the resource sheet view.
- Add the "RBS" costum column. (Read more "Add resources in MS Project")
- Set resources the RBS code.
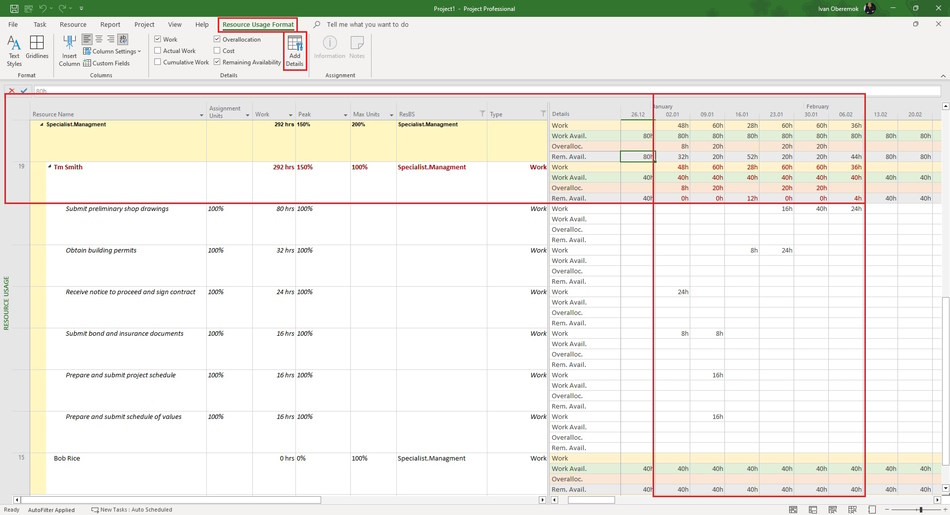
- Open the resource usage view.
- Add columns: "Assigment Units", "Work", "Peak", "Max. Units", "RBS" and "Type".
- Set the "Work" in the "Type" column filter.
- Set the "Specialist" in the "RBS" column filter.
- Set group by the "RBS" column.
- Click the "Resource Usage Format" item in the top menu.
- Click the ""Add Details button.
- Select fields: "Work", "Work Availability", "Overalocation" and "Remaining Availability".
- Click the "Ok" button in the "Detail Styles" window.
- Close the resource group with no overloaded resources. Overloaded resources are highlighted in red.
- The amount of resources recommended by the MS Project Pro is shown in the "Peak" column.
- The number of available resources is given in the "Max. Units" column.
- Set the week time period. (Read more "Timescale in MS Project Pro")
- The right side displays the following resource data for the periods:
- Work - assigned work per resource.
- Work Availability - hours available for appointment.
- Overalocation - number of hours of overload.
- Remaining Availability - number of hours remaining available.
- The group field has calculated values for the entire group of available resources.
- If there are zeros in the "Remaining Availability" field, this means that the group's available resources are not enough to implement the tasks during this period.
- If there are values in the "Overalocation" field, this means that it is necessary to distribute tasks among group members.
- You can decrease assignment units on a task for resources in the "Assignment Units" column. Select tasks that fell into an overloaded period.
- You can decrease work on a task for resources in the "Work" column. Select tasks that fell into an overloaded period.
Leveling group resources by adding resources in MS Project Pro
After assigning shared resources in MS Project Pro, you can determine how many crew and specialists you will need
Steps to describe group resources by adding resources in MS Project Pro:
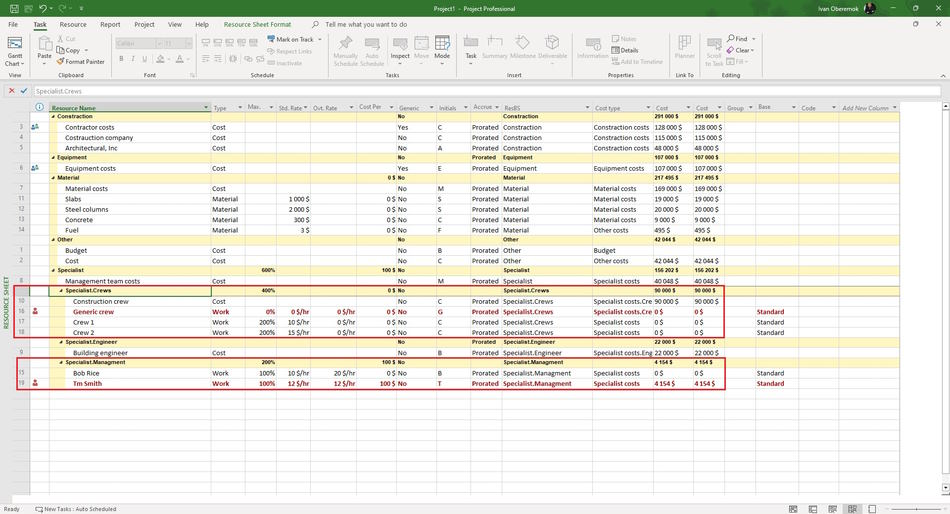
- Open the resource sheet view.
- Add generic resources. (Read more "Adding specialists to the plan in MS Project Pro")
- Add resources. It can be either individual specialists or a crew.
- Add the "RBS" costum column. (Read more "Add resources in MS Project")
- Set resources the RBS code.
- Set the zero in the "Max," column for the generic resource in the group.
Steps to level the resource by adding resources in MS Project Pro:
- Open the Gantt chart view.
- Assign generic resources to tasks. (Read more "Assigning specialists to tasks in MS Project Pro")
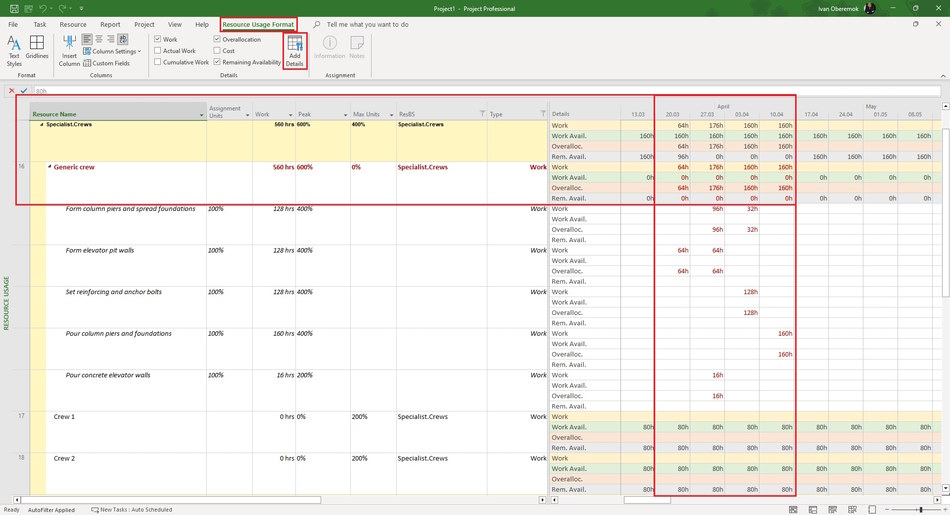
- Open the resource usage view.
- Add columns: "Assigment Units", "Work", "Peak", "Max. Units", "RBS" and "Type".
- Set the "Work" in the "Type" column filter.
- Set the "Specialist" in the "RBS" column filter.
- Set group by the "RBS" column.
- Click the "Resource Usage Format" item in the top menu.
- Click the ""Add Details button.
- Select fields: "Work", "Work Availability", "Overalocation" and "Remaining Availability".
- Click the "Ok" button in the "Detail Styles" window.
- Close the resource group with no overloaded resources. Overloaded resources are highlighted in red.
- The amount of resources recommended by the MS Project Pro is shown in the "Peak" column.
- The number of available resources is given in the "Max. Units" column.
- Set the week time period. (Read more "Timescale in MS Project Pro")
- The right side displays the following resource data for the periods:
- Work - assigned work per resource.
- Work Availability - hours available for appointment.
- Overalocation - number of hours of overload.
- Remaining Availability - number of hours remaining available.
- The group field has calculated values for the entire group of available resources.
- If there are zeros in the "Remaining Availability" field, this means that the group's available resources are not enough to implement the tasks during this period.
- If there are values in the "Overalocation" field, this means that it is necessary to distribute tasks among group members.
- You can decrease assignment units on a task for resources in the "Assignment Units" column. Select tasks that fell into an overloaded period.
- You can decrease work on a task for resources in the "Work" column. Select tasks that fell into an overloaded period.
- You can shift the deadlines for the implementation of tasks for more free periods in the Gantt chart view.
- The number of calculated resources in the "Peak" column for the group must be equal to or less than the number of available resources in the "Max. Units" column.
- Reassign tasks from a generic resource to other free group resources. (Read more "Replacing resource in the task in MS Project Pro")
#msprojectpro, #oberemokii, #projectmanagment, #projectresourcemanagement, #planningprocess

Author: Ivan Oberemok
