
Adding specialists to the plan in MS Project Pro
Contents:
- Adding specialists in MS Project Pro
- Description of equipment resources in MS Project Pro
- Creating a custom organizational breakdown structure (OBS) column in MS Project Pro
- Chat
Adding specialists in MS Project Pro
In MS Project Pro you can describe the following types of specialists:
- Specialists type. The resource is used to describe the type of work resources needed to implement the tasks. Such a resource is described using a generic work resource.
- Specialist group. The resource is used to describe group of specialist how has same skills. The number of specialist in the group would be indicated in the "Max" column.
- Specialist. The resource is used to describe one specialist with unic the list of skills.
Steps to add specialists in MS Project Pro:
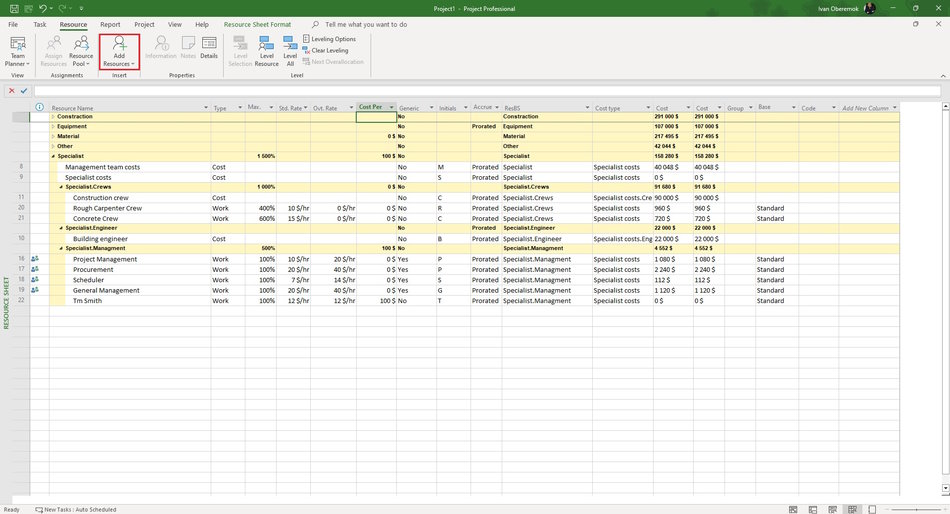
- Open the resource sheet view.
- Enter the specialist name in the "Resource Name" column.
- Set the "Work" in the "Type" column.
- Set the number of specialist in the group in the "Max." column.
- Set the cost of using a specialist in the "Std. Rate" column. You can specify the cost for periods: hour - "hr", day - "d", week - "wk", month - "mo", year - "yr".
- Set the "Specialist costs" in the "Cost type" custom filed.
- Set the "Specialist" in the "ResBS" custom filed.
Description of specialist in MS Project Pro
Steps to description of specialist in MS Project Pro:
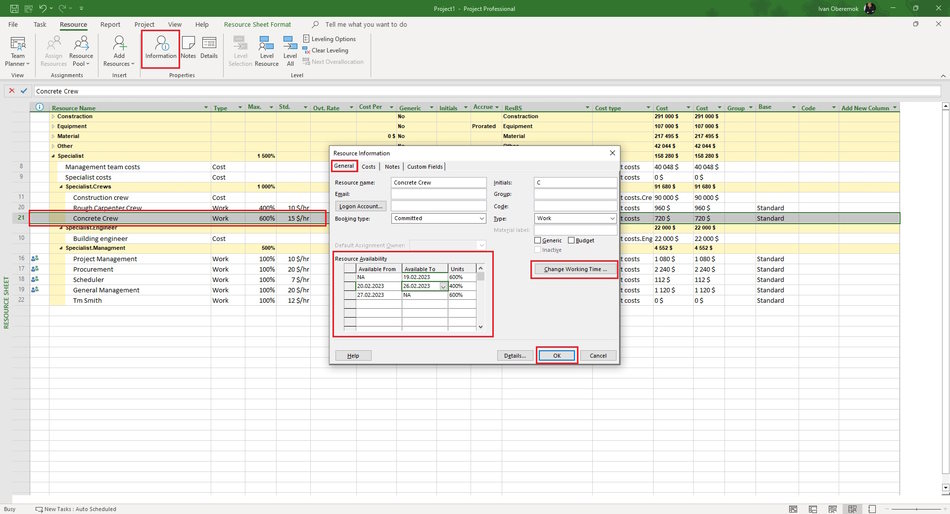
- Duble-click the specialist resource.
- Click the "General" tub.
- Enter the specialist name in the "Resource Name:" field.
- Set the "Work" in the "Type" column.
- You can specify the resource availability level in the "Resource Availability" table.
- If you want change resource calendar, click by the "Change Working Time ..." button.
- Enter the equipment code in the "Code:" field.
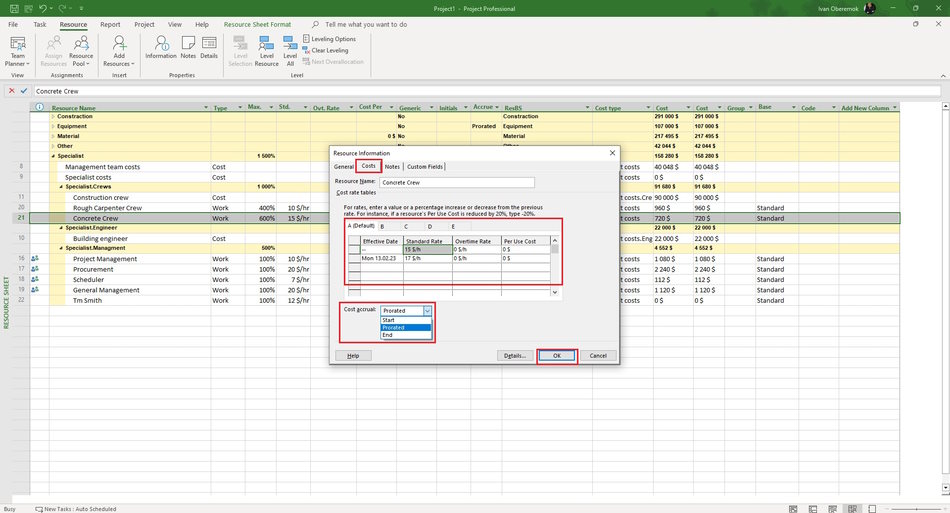
- Click the "Coste" tub.
- Set the type of specialist resource. System use the "A" type for default.
- You can add a new rates in the "Cost rate tables" table :
- Enter the rate start date in the "Effective Date" column.
- Enter the rate value in the "Standard Rate" column.
- Enter the per use cost in the "Per Use Cost" column.
- You can set accrue in the "Cost accual:" field.
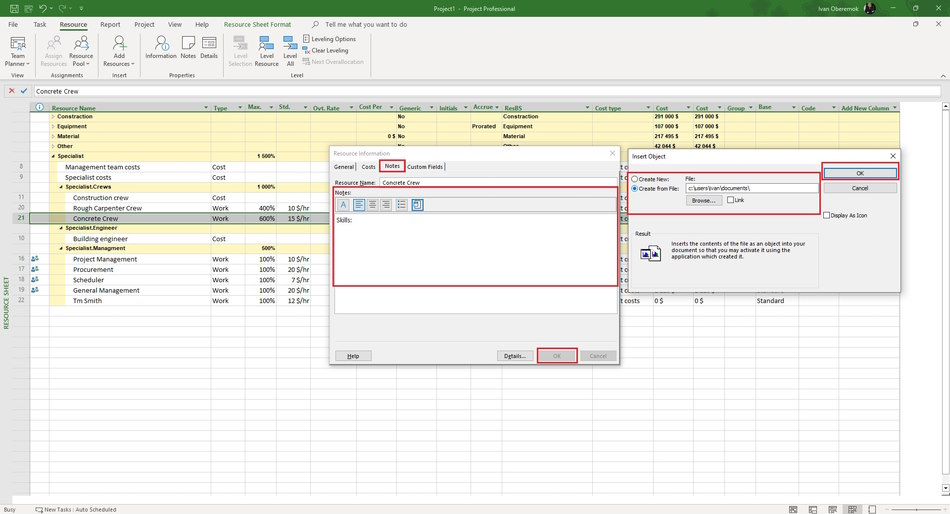
- Click the "Notes" tub.
- In the Notes text box, enter your note text. It is possible to format the entered text by clicking on the appropriate buttons "Format Font", "Align left", "Align center", "Align right", "Bulleted list".
- In the "Resource Infromation" window, on the "Notes" tab, click the "Insert Object" button. You can add a description of the specialist or a link to a file with a description.
- In the "Insert object" window, click the "Create from file" button. Enter the full name of the file (including the path) you want to attach to the resource, or click the Browse button and browse for your file.
- To add an object to a project file, select the "Link" check box. Keep only references to this object.
- To display the object as an icon, select the "Display As Icon" checkbox:
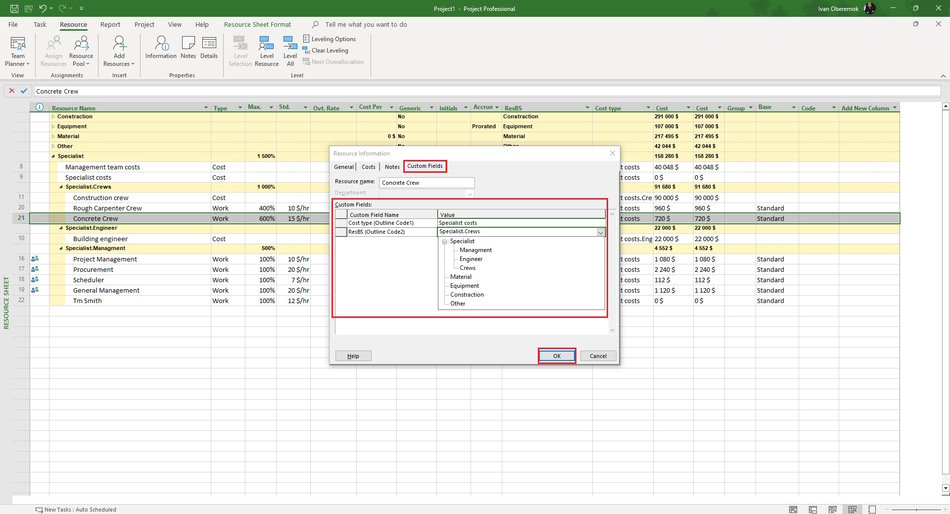
- Click the "Custom Fields" tub in the "Resource Information" window.
- Enter values in the custom column.
- Click the "Ok" button.
Creating a custom organizational breakdown structure (OBS) column in MS Project Pro
You can use the custom organizational breakdown structure column for filter and group.
Steps to create a custom organizational breakdown structure column in MS Project Pro:
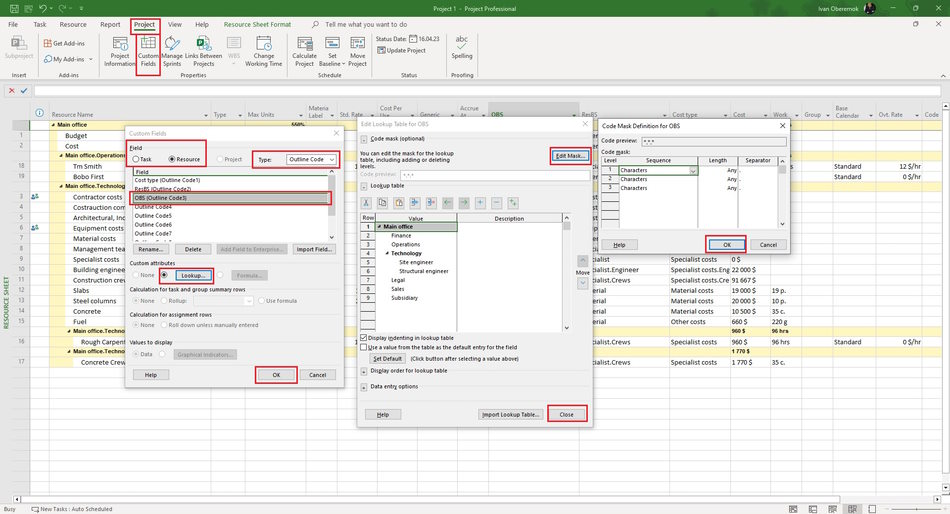
- Click the "Project" button in the top menu.
- Click the "Custom Fields" button in the "Properties" block.
- Click the "Resource" box.
- Select the "Outline Code" in the "Type" field.
- Select an empty field and rename it by click the "Rename ..." button.
- Set the list of values by clicking the "Lookup ..." button.
- Set the mask by clicking the "Edit Mask ..." button.
- Set the mask level and type of mask code in the "Code mask" block.
- Click the "Ok" button.
- Set the list of cost types in the "Lookup table" block. (Read more "Adding the custom fields in MS Project Pro").
- Set the default value.
- Click the "Close" button in the "Edit lookup Table for Cost Type" window.
- Click the "Ok" button in the "Custom Fields" window.
#msprojectpro, #oberemokii, #projectmanagment, #projectresourcemanagement, #initiatingprocess

Author: Ivan Oberemok
