
Timescale in MS Project Pro
Contents:
Using the timescale in MS Project Pro
Steps to set the timescale in MS Project Pro:
- Click the "View" item in the top menu.
- You can set the time period on a Gantt chart in the "Timescale:" field in the "Zoom" block.
- You can show the entire project on a Gantt chart by clicking the "EntireProject" button in the "Zoom" block.
- You can show selected tasks on a Gantt chart by clicking the "Selected Tasks" button in the "Zoom" block.
- You can zoom in on tasks on a Gantt chart by clicking the "Zoom" button and selecting the "Zoom In" item.
- You can zoom out on tasks on a Gantt chart by clicking the "Zoom" button and selecting the "Zoom Out" item.
- You can set custom zoom:
- Click the "Zoom" button
- Select the "Zoom ..." item.
- Select the time period.
- Or set tne number and time format (days, week, month).
- Click the "Ok" button.

Customizing the timescale in MS Project Pro
Steps to customize the timescale in MS Project Pro:
- Double click on the gantt chart timescale.
- Set timescale options in the "Timescale options" block.
- Set timescale levels in the "Show" field.
- Set the width of the time period in the "Size" field.
- Show or hide the scale separator by clicking "Scale separator" box.
- Select the timescale level on top of the window.
- Set the time units in the "Units:" field.
- Set the interval in the "Count:" field.
- Select the date format in the "Label:" field.
- Select the type of align in the "Align:" field.
- You can show or hide the fiscal calendar by clicking the "Use fiscal year" box.
- You can show or hide the tike line by clicking the "Tick lines" box.
- Click the "Ok" button.

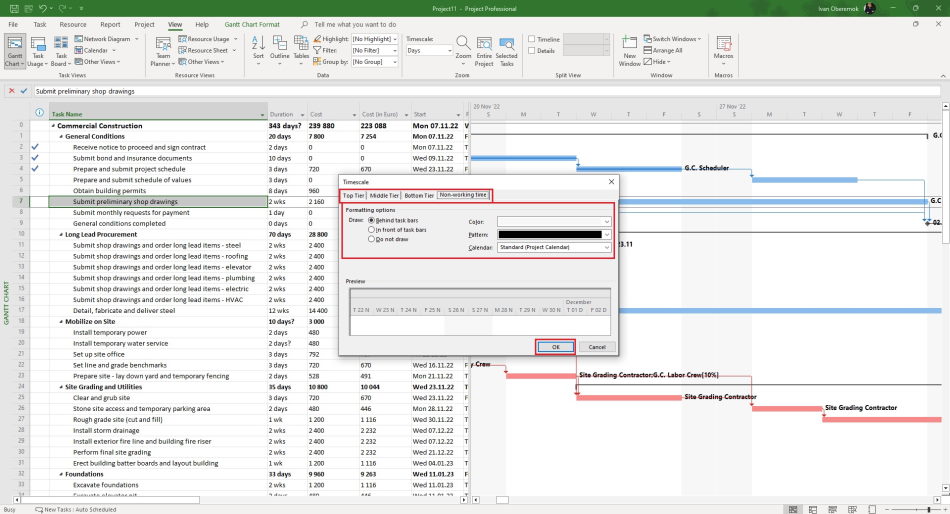
Steps to customize the timescale in MS Project Pro:
- Double click on the gantt chart timescale.
- Click the "Non-working time" tub.
- Set the display format to non-working time in the "Draw:" block.
- You can set the background color of the non-working time in the "Color" field.
- You can set the background pattern of the non-working time in the "Pattern" field.
- You can set the calendar of the non-working time in the "Caledar" field.
- Click the "Ok" button.
#msprojectpro, #oberemokii, #projectmanagment, #projectintegrationmanagement, #planningprocess

Author: Ivan Oberemok
