
Setting actual tasks and costs for contractors in MS Project Pro
Contents:
- Setting actual duration and completed products for contractor tasks in MS Project Pro
- Setting active costs in the task usage view in MS Project Pro
- Setting active costs in the resource usage view in MS Project Pro
- Chat
Setting actual duration and completed products for contractor tasks in MS Project Pro
At the close of the current implementation period, you must establish that the tasks of the contractor have been completed. In addition to the fact of completion, you can establish the actual costs of the contractor. Let's establish the fact that the contractor's tasks have been completed.
Steps to set actual duration and complited products for contractor tasks in MS Project Pro:
- Open the Gantt view.
- Add columns: "% Complited", "Actual Start" and "Actual Duration".
- Add the "% product" column. (Read more "Creating custom fields for product quantification in MS Project Pro")
- Add the "Contract" column. (Read more "Assigning contractor resources in MS Project Pro")
- Set filter by the "Contract" field. (Read more "Using filter by the field in MS Project Pro")
- Add the "Certificate of Completion" column:
- Click the "Project" button in the top menu.
- Click the "Custom Fields" button in the "Properties" block.
- Click the "Task" box in the "Field" block.
- Select the "Text" type in the "Type:" field.
- Rename the empty field by clicking the "Rename ..." button (For example "Certificate of Completion").
- Click the "Ok" button.
- Set the percent of product completed in the "% product" field.
- Set the actual start date in the "Actual Start" field or update the start date in the "Start" field.
- Set the actual task duration in the "Actual Duration" field.
- Set teh percent of task complited in the "% Complited" field.
- If the task has completed enter the number and the date of the certificate of completion in the "Certificate of Completion" field.

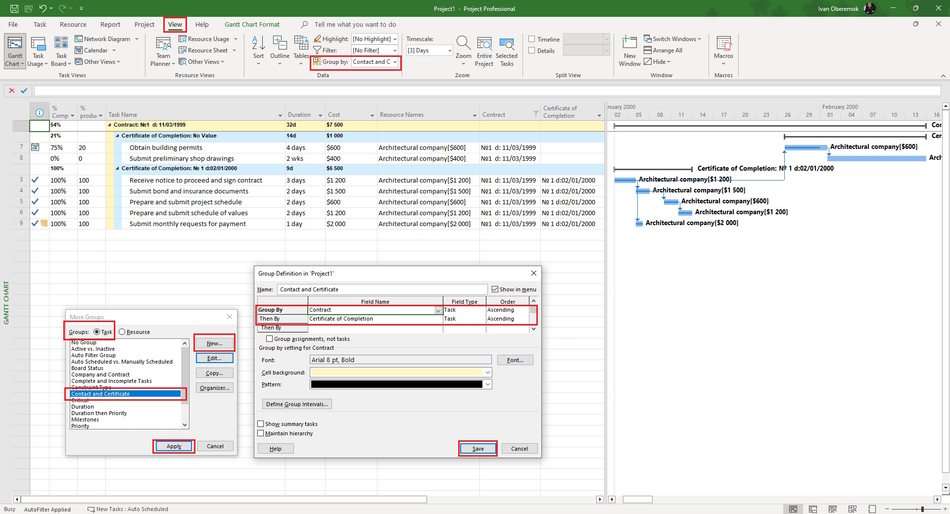
Steps to сreating of a grouping by the fields "Company" and "Certificate of Completion":
- Open the Gantt chart view.
- Create groupings by "Company" and "Contract" fields: (Read more "Grouping project data in MS Project Pro")
- Click "View" the item in the top menu.
- Open the "Group" field in the "Data" block.
- Click the "More Groups ..." item.
- Set the "Task" in the "Group:" block.
- Click the "New ..." button.
- Enter the group name in the "Name:" field. (For example "Company and Certificate")
- Click the "Show in menu" box.
- In the "Field Name" column, set fieleds: "Company" and "Certificate of Completion".
- Click the "Save" button.
- Select the "Company and Certificate" group.
- Click the "Apply" button.
Use this group to analyze the quality of filling in the fact that the tasks of the contractor are completed.
Setting active costs for contractor tasks in the task usage view in MS Project Pro
MS Project Pro sets the actual cost when setting the fact that tasks are completed. But you need to specify actual tasks for tasks for the period,
Steps to set active costs for contractor tasks in the task usage view in MS Project Pro:
- Open the task usage view.
- Add columns: "Cost", "Basline Cost", "Cost Variance", "Actual Cost" and "Remaning Cost".
- Click the "Task Usage Format" item in the top menu.
- Clck the "Add Details" button in the "Details" block.
- Add fields: "Basline Cost", "Cost" and "Actual Cost"
- Set the time period. We recommend setting the time period to a month. (Read more "Timescale in MS Project Pro")
- Check the actual cost in the period and adjust if necessary in the "Actual Cost" field.
- Compare the actual and planned costs for the closing period, they must be the same.

Set active costs for contractor tasks in the resource usage view in MS Project Pro
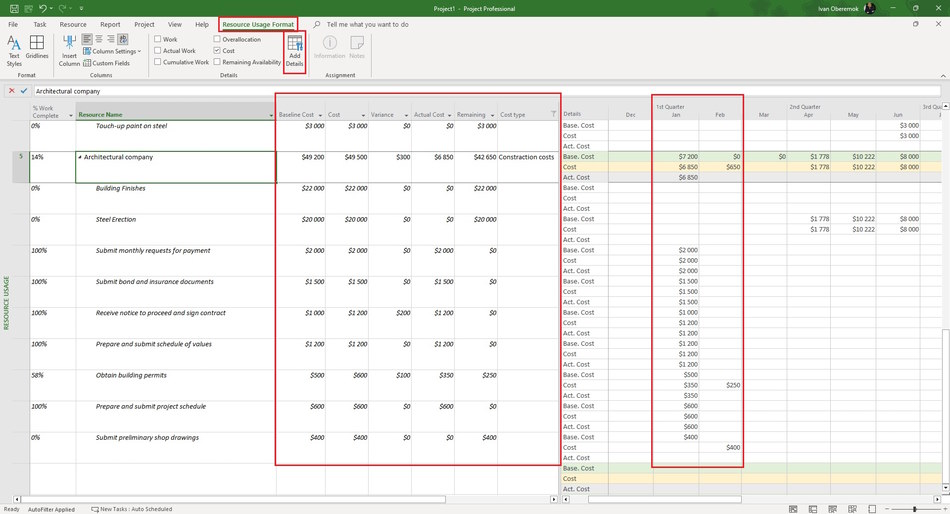
You can set the actual costs on contractor tasks per period for each contractor separately.
Steps to set active costs for contractor tasks in the task usage view in MS Project Pro:
- Open the resource usage view.
- Add columns: "Cost", "Basline Cost", "Cost Variance", "Actual Cost" and "Remaning Cost".
- Click the "Resource Usage Format" item in the top menu.
- Clck the "Add Details" button in the "Details" block.
- Add fields: "Basline Cost", "Cost" and "Actual Cost"
- Set the time period. We recommend setting the time period to a month. (Read more "Timescale in MS Project Pro")
- Check the actual cost in the period and adjust if necessary in the "Actual Cost" field.
- Compare the actual and planned costs for the closing period, they must be the same.

Author: Ivan Oberemok
