
Detailed assignment of resources in MS Project Pro
Contents:
- Detailed assignment of resources in the task usage in MS Project Pro
- Detailed assignment of resources in the resource usage in MS Project Pro
- Chat
Detailed assignment of resources in the task usage view in MS Project Pro
You can detail the assignment of resources to a task usage view in MS Project Pro. You can add detail only after assigning resources. (Read more "Assigning resources in MS Project")
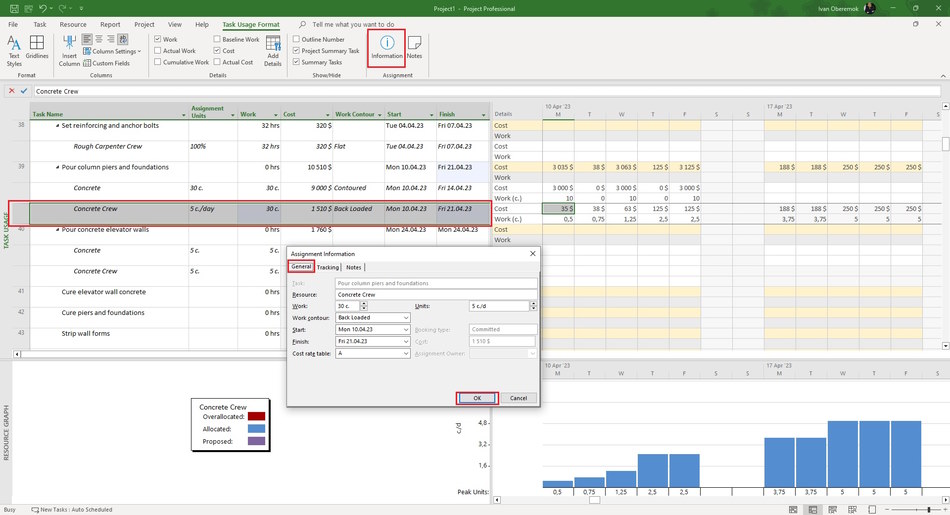
Steps to detailed assignment of resources in the task usage in MS Project Pro:
- Open the task usage view.
- Click the "Task Usage Format" item in top menu.
- Select the assign resource and click the "Information" button in the "Assignment" block.
- Or duble-click the the assign resource.
- Click the "General" tab.
- Set the detailed assignment of resource:
- Work - number of works for the period.
- Units - resource assign units.
- Work contour - resource assignment template.
- Start - appointment start date.
- Finish - appointment end date.
- Cost rate table: - resource assignment cost rate.
- Click the "Ok" button.
Resource assignment template:
- Flat - even distribution of hours over the entire duration of the task.
- Back Loaded - maximum number of hours at the end of the task.
- Font Loaded - maximum number of hours at the start of the task
- Doube Peak - two peak hours by task duration.
- Early Peak - maximum number of hours in the first part of the task.
- Late Peak - maximum number of hours in the last part of the task.
- Bell - maximum number of hours in the middle of a task.
- Turtle - maximum number of hours in the middle of a task with uniform distribution.
- Click the "Notes" tub.
- In the Notes text box, enter your note text. It is possible to format the entered text by clicking on the appropriate buttons "Format Font", "Align left", "Align center", "Align right", "Bulleted list".
- In the "Resource Infromation" window, on the "Notes" tab, click the "Insert Object" button. You can add a description of the specialist or a link to a file with a description.
- In the "Insert object" window, click the "Create from file" button. Enter the full name of the file (including the path) you want to attach to the resource asssign, or click the Browse button and browse for your file.
- To add an object to a project file, select the "Link" check box. Keep only references to this object.
- To display the object as an icon, select the "Display As Icon" checkbox:

Detailed assignment of resources in the resource usage view in MS Project Pro
Steps to detailed assignment of resources in the resource usage view in MS Project Pro:
- Open the resource usage view.
- Click the "Resource Usage Format" item in top menu.
- Select the assign resource and click the "Information" button in the "Assignment" block.
- Or duble-click the the assign resource.
- Click the "General" tab.
- Set the detailed assignment of resource:
- Work - number of works for the period.
- Units - resource assign units.
- Work contour - resource assignment template.
- Start - appointment start date.
- Finish - appointment end date.
- Cost rate table: - resource assignment cost rate.
- Click the "Ok" button.

#msprojectpro, #oberemokii, #projectmanagment, #projectresourcemanagement, #planningprocess

Author: Ivan Oberemok
