
Description the task in MS Project Pro

Contents:
- Description of the main parameters of tasks in MS Project Pro
- Adding documents to a task in MS Project Pro
- Description of additional task settings in MS Project Pro
- Describing details tasks in MS Project Pro
- Chat
Description of the main parameters of tasks in MS Project Pro
Task information is divided into MS Project Pro separate groups. It helps to enter and analyze information. General information presented to the group "General".
The steps of description a new task:
- Open the "Gantt Chart" view in your plan.
- Double click the left mouse button on the task. Or click in the item "Information" in the block "Properties". Or press button "Shift+F2".
- The main tasks information you can enter in the tab "General".
In the window you can set the following parameters:
- The name of the task is indicated in the "Name:" field.
- The duration of the work implementation is indicated in the "Duration:" field.
- To indicate the estimated duration values, the “Estimated” checkbox is put in the duration values, the “?” sign is added.
- The percentage of task completion is set in the "Percentage of completion" field.
- The task priority is set in the "Priority" field.
- The scheduling mode is set in the "Manually Scheduled" and "Auto Scheduled" items in block "Schedule Mode".
- You can mark a task as inactive in the "Inactive" field
- The "Start:" and "End:" fields indicate the start or end dates of the tasks. Constraint are applied automatically after changes are made.
- To show the task on the timeline, check the box "Display on Timeline"
- To hide the task in the diagram, set the "Hide Bar" checkbox.
- To show the current task and its status on the upper levels of the chart, set the "Rollup" checkbox. It is convenient to use to display important tasks for management.

Adding documents to a task in MS Project Pro
MS Project allows you to add supporting information for project tasks. It could be:
- Task note;
- Accompanying file;
- Hyperlink.
To add a note to a task:
- Open the "Gantt Chart" view in your plan.
- Double click the left mouse button on the task. Or click in the item "Information" in the block "Properties". Or press button "Shift+F2".
- The main tasks information you can enter in the tab "Notes".
- In the Notes text box, enter your note text. It is possible to format the entered text by clicking on the appropriate buttons "Format Font", "Align left", "Align center", "Align right", "Bulleted list".
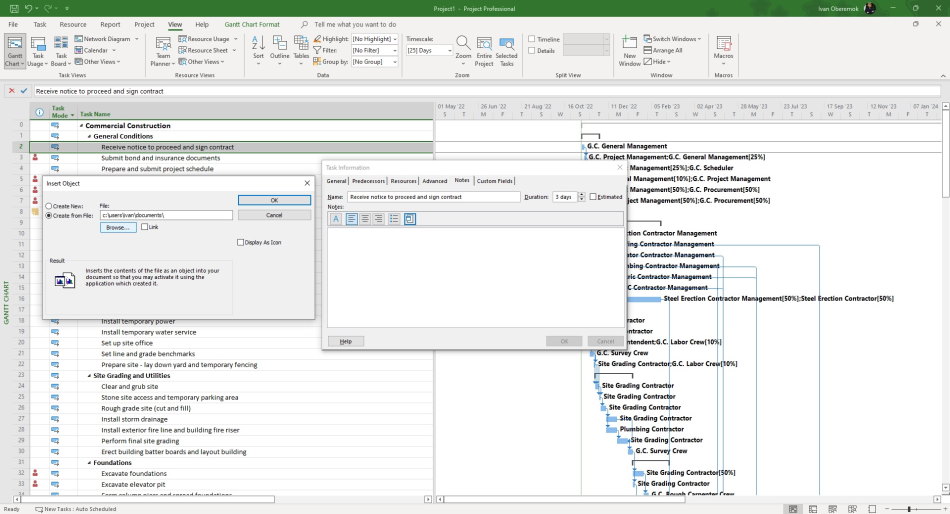
The steps of to attach a file to a task description:
- In the "Task Information" window, on the "Notes" tab, click the "Insert Object" button.
- In the "Insert object" window, click the "Create from file" button. Enter the full name of the file (including the path) you want to attach to the task, or click the Browse button and browse for your file.
- To add an object to a project file, select the "Link" check box. Keep only references to this object.
- To display the object as an icon, select the "Display As Icon" checkbox:
Description of additional task settings in MS Project Pro
The Advanced settings you can add to the group "Advanced".
The steps of add a advanced settings task:
- Open the "Gantt Chart" view in your plan.
- Double click the left mouse button on the task. Or click in the item "Information" in the block "Properties". Or press button "Shift+F2".
- The main tasks information you can enter in the tab "Advanced".
In the window you can set the following parameters:
- The deadline for the task is set in the "Deadline:" field.
- Type task constraint are set in the field "Constraint".
- The task type is set in the "Task type:" field.
- Task calendar is set in the "Calendar" field.
- The WBS code task is set in the "WBS code:" field
- You can select the fields for calculating the earned value method in the "Earned value method" field.
- To specify a task as a milestone, set the "Mark task as milestone" checkbox.

Describing details tasks in MS Project Pro
You can describe a task details in MS Project Pro.
The steps of describing a task details in MS Project Pro:
- Open the "Gantt Chart" view in your plan.
- Click the item "Task" on the top menu.
- Click the item "Details" on the block "Properties".
- Click the item "Task Form Format" in the top menu.
- Select type of form in the "Type" block.
- Select type of date in the "Details" block.

#msprojectpro, #oberemokii, #projectmanagment, #projectscopemanagement, #projectschedulemanagement

Author: Ivan Oberemok
