
Formatting a Gantt Chart in MS Project Pro
Contents:
- Formatting tasks on the Gantt chart in MS Project Pro
- Formatting a task on a Gantt chart in MS Project Pro
- Chat
Formatting tasks on the Gantt chart in MS Project Pro
In MS Project, you can change the format of the Gantt chart. You can change the default gantt chart settings. Also, you can add your settings to the gantt chart.

The steps to style the gantt chart:
- Click the "Format" on the "Grant Chart Format" tab, in the "Bar Styles" group.
- Click the menu item "Bar Style".
- Select the type of elements for which you want to set the design.
- The name of the element is displayed in the column "Name". The element's style is displayed in the column "Appearance".
- The column "Show For ... Tasks" shows the condition under which the element is displayed. The column contains the names of the flag type system columns. The element is displayed when all columns have "True".
- The column "Row" shows the place of the element within the task.
- The column "From" shows the start date and the column "To" shows the end date of the element on the gantt chart.
- You can change style of element on the tab "Bars" and change description on the tab "Text".
- Set the shapes from which the chart element will be built in fields "Shape" for the "Start", "Middle" and "End". You must specify at least one figure.
- Set the fill style for the chart element in fields "Type".
- Set the color of the chart element in fileds "Colors".
- You can specify any system field to display in different parts of the element. You can place information at the bottom, top, left, right, and even inside an element.
- Select the field to display in the desired location of the element.
- To accept the settings, press "Ok".
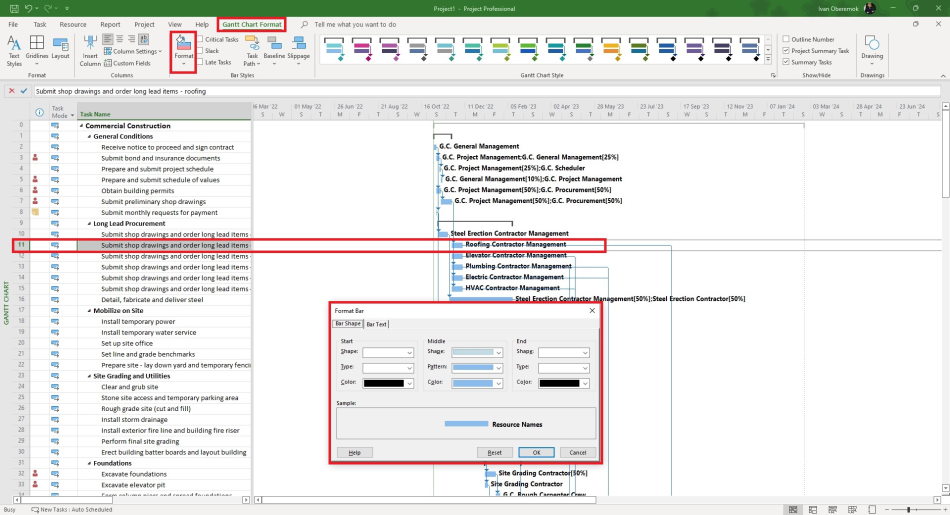
You can also change the style of selected Gantt chart elements. The custom styling overrides the styling of the item category.
The steps to style the one element of the gantt chart:
- Select the ont element in your plan.
- Click the "Format" on the "Grant Chart Format" tab, in the "Bar Styles" group.
- Click the menu item "Bar".
- You can change style of element on the tab "Bar Shape" and change description on the tab "Bar Text".
- Set the shapes from which the chart element will be built in fields "Shape" for the "Start", "Middle" and "End". You must specify at least one figure.
- Set the fill style for the chart element in fields "Type".
- Set the color of the chart element in fileds "Colors".
- You can specify any system field to display in different parts of the element. You can place information at the bottom, top, left, right, and even inside an element.
- Select the field to display in the desired location of the element.
- To accept the settings, press "Ok".
Formatting a task on a Gantt chart in MS Project Pro
You can choose different gantt chart style with one click. The system MS Project Pro has already created styles that you can select and apply for your plan.
The steps to change the plan's style:
- Click the "Grant Chart Format" tab on the ribbon.
- Select the style in the menu.
- Click on a style to apply it to the plan.

#oberemokii, #msprojectpro, #projectintegrationmanagement, #projectschedulemanagement, #initiatingprocess

Author: Ivan Oberemok
