
Adding the drawing to Gantt chart in MS Project Pro
Contents:
Adding the drawing to Gantt chart in MS Project Pro
Steps to add the drawing to Gantt chart in MS Project Pro:
- Open Gantt chart
- Click the "Gantt Chart Format" item in the top menu.
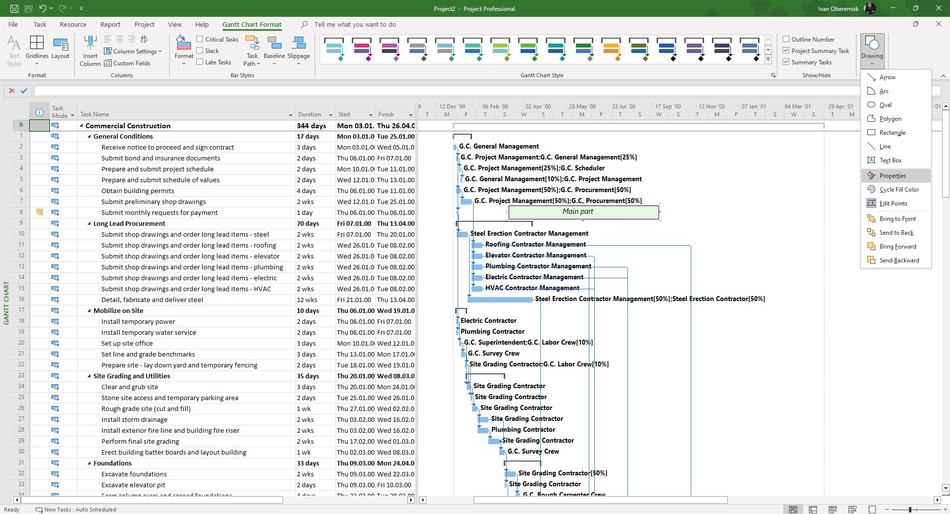
- Clic the "Drawing" button in the "Drawings" block.
- Select a drawing item and add it to the Gantt chart.
Steps to set the drawing properties:
- Select the drawing
- Right click and select the "Properties" item.
- or click the "Properties" item in the "Drawing" button.
You can add same drawings to Gantt chart. You can change drawings position in the menu of the "Drawing" button.
Customizing the drawing to MS Project Pro
Steps to customize the text font in the drawing.
- Select the drawing.
- Right click and select "Font" item.
- Select the font name in the "Font:" block.
- Select the font style in the "Font style:" block.
- Set the font size in the "Size:" field.
- You can set underline text by clicking "Underline" box.
- You can set strikethrough text by clicking "Strikethrough" box.
- Set the font color in the "Color:" field.
- Set the font background color in the "Background Color:" field.
- Set the font background pattern in the "Background Pattern:" field.
- Click the "Ok" button.
Steps to customize the properties in the drawing.
- Select the drawing.
- Right click and select "Properties" item.
- Click the "Line & Full" tub.
- If you want to show the drawing line, click the "Custom" box in the "Line" block.
- Set the line color in the "Color:" field.
- Set the line type in the "Line:" field.
- If you want to change the drawing full, click the "Custom" box in the "Full" block.
- Set the full color in the "Color:" field.
- Set the full type in the "Line:" field.
- Click the "Ok" button.
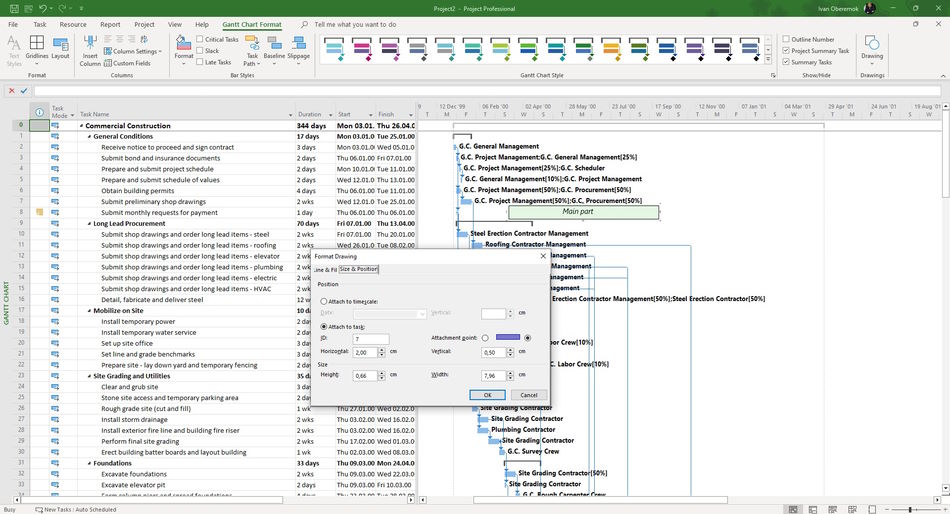
- Click the "Size & Position" tub.
- If you want to attach to some date:
- Click the "Attach to timescale:" box.
- Set the date in the "Date" field.
- Set vertical offset from date in the "Vertical:" field.
- If you want to attach to some task:
- Click the "Attach to task:" box.
- Set the ID task in the "ID" field.
- Set the anchor point to the beginning or end of the task in the "Attachment point:" box.
- Set horizontal offset from date in the "Horizontal:" field.
- Set vertical offset from date in the "Vertical:" field.
- You can change the drawing size in the "Size" block:
- Set drawing height in the "Height:" field.
- Set drawing width in the "Width:" field.
- Click the "Ok" button.
#msprojectpro, #oberemokii, #projectmanagment, #projectintegrationmanagement, #initiatingprocess

Author: Ivan Oberemok
