
Export data from MS Project Pro to MS Excel
Contents:
Export data from MS Project Pro to MS Excel
Steps to export data from MS Project Pro to MS Excel
- Click the "File" item in the top menu.
- Click the "Export" item in the left manu.
- Click the "Save Project as File" button of the "Export" window.
- Click the "Microsoft Excel Workbook" button in the "Other File Types" block.
- Click the "Save as" button.

Steps to create a new template to export data from MS Project Pro to MS Excel:
- Enter a name and location file in the "Save As" window.
- Click the "Next >" button in the "Welcome" window.
- Select the type of export template. If you would like to create your own template, click the "Select Data" button.
- Click the "Next >" button.
- Select the map. If you would like to create a new map, click the "New map" button.
- Click the "Next >" button.
- Select the type of project data in the "Select the type of date you want to export" block.
- Click the "Next >" button.
- If you want to export field header, click the "Export includes header" box.
- If you want to export assignment data, click the "Include assignment rows in output" box.
- Click the "Next >" button.

Steps create a new map:
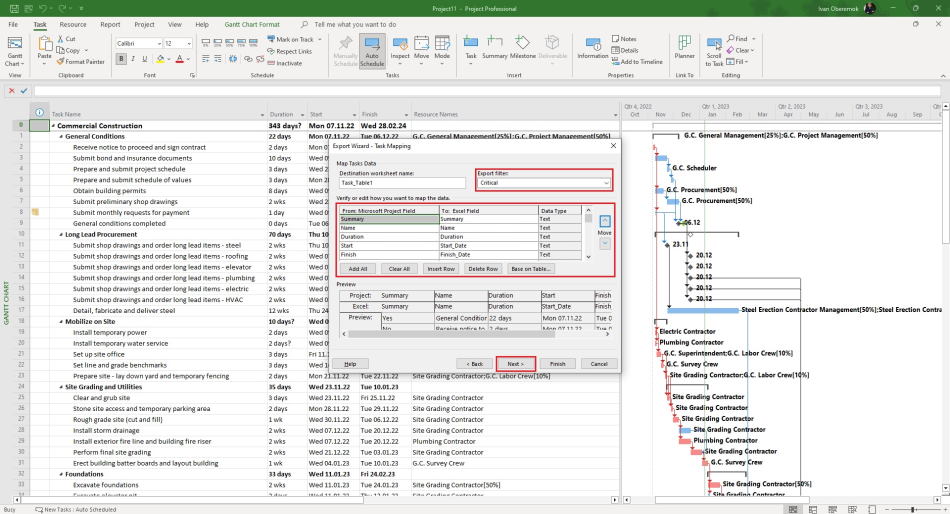
- Enter the worksheet name in the "Destiantion worksheet name:" filed.
- Select the filter in the "Export filter:" field.
- Set the project fields mame in the "From: Microsoft Project Field" field.
- You an change excel fields name in the "To: Excel Field" filed.
- You can see the data type in the "Data Type" field.
- If you want to add all (tasks, resources, assigments) field, click the "Add All" button.
- If you want to delete all field, click the "Clear All" button.
- If you want to insert field, click the "Insert Row" button or click the "Insert" button on the keyboard.
- If you want to delete field, select the field and click the "Delete Row" button or click the "Delete" button on the keyboard.
- You can add field form the table. click the "Base on Table ..." button and select the table name from the list.
- Click the "Next >" button.
- You can save the map, click the "Save Map ..." button.
- Enter the map name in the "Map name" field in the "Save Map" window.
- Click the "Save" button in the "Save Map" window..
- Click the "Finish" button.
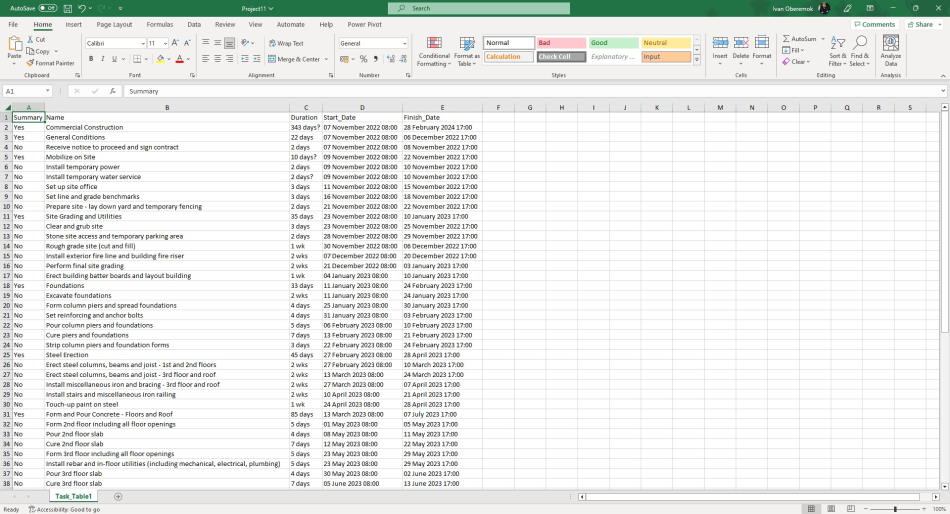
You can see the export result in an excel file.
You can customize this file like any excel file.
#msprojectpro, #oberemokii, #projectmanagment, #projectintegrationmanagement, #planningprocess

Author: Ivan Oberemok
