
Calendar view in MS Project Pro
Contents:
- Using calendar view in MS Project Pro
- Customizing bar styles in calendar view in MS Project Pro
- Customizing the gridlines style in calendar view in MS Project Pro
- Customizing the timescale style in calendar view in MS Project Pro
- Chat
Using calendar view in MS Project Pro
MS Project Pro has a calendar view where you can see tasks in different periods. This view looks like a diary.
Steps to use calendar view in MS Project Pro:
- You can show all tasks of the month, click the "Month" button.
- You can show all tasks of the week, click the "Week" button.
- You can chose time period:
- Click the "Custome" button.
- Set the number of weeks you want to show in the "Number of weeks:" field
- Set the period's start date in the "From" field.
- Set the period's end date in the "To" field.
- Click the "Ok" button.
- You can adjust the height of the calendar view rows by clicking the "Adjust Week Height" button.
- You can show the list of tasks in selected day:
- Select the day
- Click the "Task List" button in the "Show/Hide" block.

Customizing bar styles in calendar view in MS Project Pro
Steps to customize bar styles in MS Project Pro:
- Click the "Calendar Format" item of the top menu.
- Click the "Bar Styles" button.
- Select the type of bar in the left block of the "Bar Styles" window.
- Set the bar style in the "Bar type:" field. If you want to hide bar set the "None".
- Set the pattern style for the bar in the "Pattern:" field.
- Set the color style for the bar in the "Color:" field.
- Set the split pattern style for the bar in the "Split pattern:" field.
- If you want to set shadow for the bar by clicking "Shadow" box.
- If you want to set bar rounding by clicking "Bar rounding" box.
- Select the "Field(s):" fields in the field you want to display in the panel.
- Set the margin alignment on the bar, select it in the "Align:" field.
- You can see an example of a bar in the "Sample:" block
- Click the "Ok" button.
Steps to show critical tasks in the calendar view in MS Project Pro:
- Click the "Calendar Format" item of the top menu.
- Click the "Bar Styles" button.
- Select the "Critical" type in the left block of the "Bar Styles" window.
- Set the red color for the bar in the "Color:" field.
- Add the "Totla Slack" field in the "Field(s):" field.
- Click the "Ok" button.

Customizing the gridlines style in calendar view in MS Project Pro
Steps to customize the gridlines style in MS Project Pro:
- Click the "Calendar Format" item of the top menu.
- Click the "Gridlines" button.
- Select the type line in the left block of the "Gridlines" window.
- Set the line type in the "Type:" field.
- Set the line color in the "Color:" field.
- Set the line interval in the "At interval:" block.
- Click the "Ok" button.

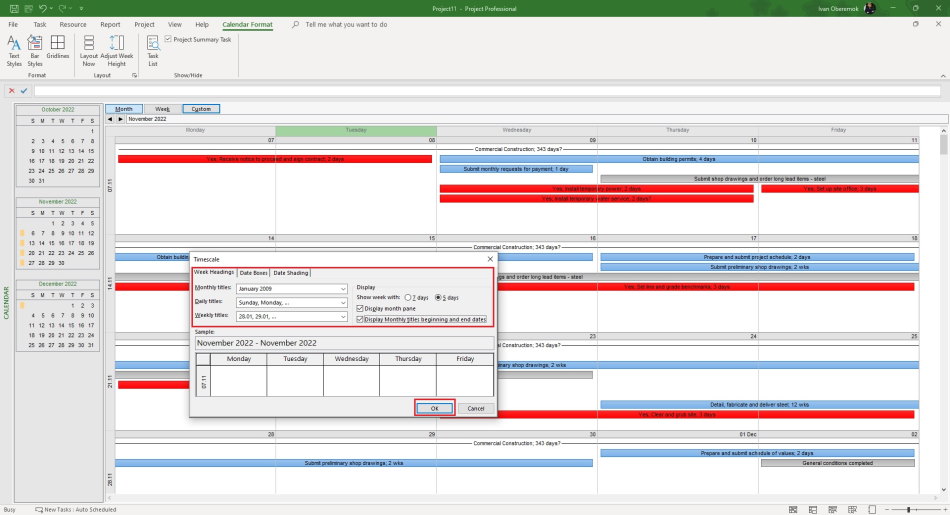
Customizing the timescale style in calendar view in MS Project Pro
Steps to customize the gridlines style in MS Project Pro:
- Click the "Calendar Format" item of the top menu.
- Double click on the timescale.
- You can customize headings style in the "Week Headings" tub in the "Timescale" window:
- You can change the title format of month in the "Monthly titles:" field.
- You can change the title format of day in the "Daily titles:" field.
- You can change the title format of week in the "Weekly titles:" field.
- If you want to show 7 days week, click the "7 days" box.
- If you want to show 5 days week, click the "5 days" box.
- You can show or hide the month pane, click the "Display month pane" box.
- You can show or hide the end month of the period, click the "Display Monthly title beginning and end dates" box.
- Click the "Ok" button.
- You can customize boxs style in the "Date Boxes" tub in the "Timescale" window:
- You can change the left top line date format in the "Left:" field in the "Top row" block.
- You can change the right top line date format in the "Right:" field in the "Top row" block.
- You can change the top line pattern in the "Pattern:" field in the "Top row" block.
- You can change the top line color in the "Color:" field in the "Top row" block.
- You can change the left bottom line date format in the "Left:" field in the "Bottom row" block.
- You can change the right bottom line date format in the "Right:" field in the "Bottom row" block.
- You can change the bottom line pattern in the "Pattern:" field in the "Bottom row" block.
- You can change the bottom line color in the "Color:" field in the "Bottom row" block.
- You can customize the boxs style in the "Date Shading" tub in the "Timescale" window:
- Select the calendar in the "Show working time for:" field.
- Set the exception type in the "Exception type:" list.
- Set the box shading pattern in the "Pattern:" field.
- Set the box shading color in the "Color:" field.
#msprojectpro, #oberemokii, #projectmanagment, #projectschedulemanagement, #planningprocess

Author: Ivan Oberemok
