
Automatic resource leveling in MS Project Pro
Contents:
Automatic resource leveling in MS Project Pro
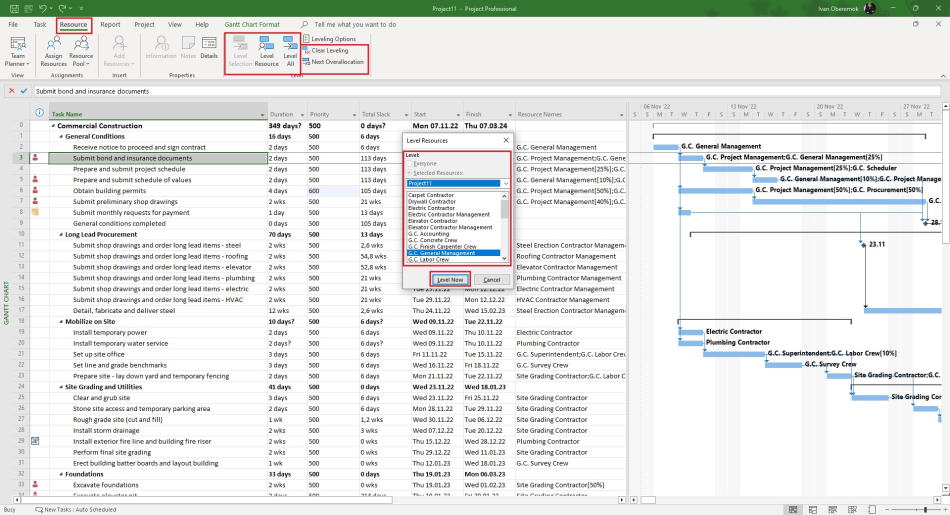
MS Project Pro has some resource leveling tools:
- Resource leveling for select tasks. Steps:
- Click the "Resource" item in the top menu.
- Select the tasks.
- Click the "Level Selection" item in the "Level" block.
- Resource leveling for select resources.
- Click the "Resource" item in the top menu.
- Click the "Level Resource" item in the "Level" block.
- Select the project name.
- Set the list of resources in the "Level:" field.
- Click the "Level Now" button.
- Resource leveling for all tasks and resources.
- Click the "Resource" item in the top menu.
- Click the "Level All" item in the "Level" block.
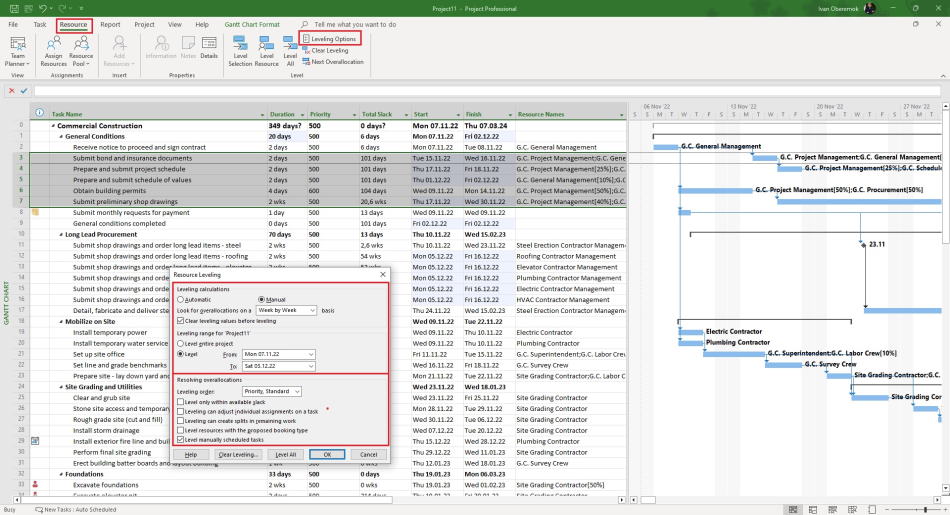
MS Project Pro aligns resources according to the alignment settings. You can set the alignment options by clicking the "Leveling Options" button.
When leveling resources, MS Project Pro shifts tasks by adding days to the "Leveling Delay" field.
If you want to clear the alignment, click the Clear Alignment button. After that, MS Project Pro will clean up the data in the "Level Delay" field.
You can show the overallocation, click the "Next Overallocation" button.
Customize resource leveling in MS Project Pro
Steps to customize resource leveling in MS Project Pro:
- Click the "Resource" item in the top menu.
- Click the "Leveling Options" item in the "Level" block.
- Select the type leveling calculations:
- Automatic. MS Project Pro will be calculationing leveling when you change something.
- Manual. MS Project Pro will be calculationing leveling when you click leveling buttons.
- If you want to clear old leveling values by clicking the "Clear leveling values before leveing" box.
- If you want to level resources for some period. Click the "Level" box and set start date in the filed.
- Select the leveling order:
- ID Only. Tasks with a higher task id number have a lower priority.
- Standard. Tasks with a higher task total slack value have a lower priority.
- Priority, Standard. The task priority is set in the "Priority" field. If a task has the same priority, then tasks with a higher total task slack value have a lower priority.
- if you want to do leveling only within avalible slack by clicking the "Level only within avalible slack" box.
- if you want to allow changing individual assignments by clicking the "Leveling can adjust individual assignments on a task" box.
- if you want to allow tasks splitting changing by clicking the "Leveling can create splits in remaining work" box.
- if you want to allow leveling proposed resources by clicking the "Leveling resources with the proposed booking type" box.
- if you want to allow leveling proposed resources by clicking the "Level resources with the proposed booking type" box.
- if you want to allow leveling manually tasks by clicking the "Level manually scheduled tasks" box.
- Click the "Ok" button.
#msprojectpro, #oberemokii, #projectmanagment, #projectresourcemanagement, #planningprocess

Author: Ivan Oberemok
