
Basic settings in MS Project Pro
Contents:
- Describe project information the file in MS Project Pro
- Setting plan general options in MS Project Pro
- Setting the display of plan information in MS Project Pro
- Setting the display of plan information in MS Project Pro
- Chat
Describe project information the file in MS Project Pro
You can add more information about your project in MS Project Pro.
Steps to add project information in MS Project Pro:
- Click the "File" item in the top menu.
- Click the "Info" item in the left menu.
- Basic information that you can add on the right side.
- You can add the more information by clicking the "Project Information" button.
- Click the "Advanced Properties" button.
- Click the "Summary" tub.
- Enter the project name in the "Title" field.
- Enter the project subject in the "Subject" field.
- Enter the plan auther in the the "Author" field.
- Enter the project manager in the "Manager" field.
- Enter the name of the company where the project is being implemented in the "Company" field.
- For your convenience, enter project category, file keyword and comments in fields: "Category:", "Keywords:" and "Comments:"
- Click the "Ok" button.

Setting plan general options in MS Project Pro
Steps to set plan general options in MS Project Pro:
- Click the "File" item in the top menu.
- Click the "Options" item in the left menu.
- Click the "General" item in the left menu of the "Project Options" window.
- Select a screen tip style in the "ScreenTip style" field of the "User Interface options" block. You can show or hide the feature description in MS Project Pro.
- Select the started view in the field "Defaulf view" in the "Project view" block.
- Select a date format for all date columns in the "Date format:" field.
- You can change the style of app in the field "Office Background:" and "Office Theme".
- You can set the "Home" page as the start page by checking the "Show the home screen when starting this application" checkbox.

Setting the display of plan information in MS Project Pro
Steps to display of plan information in MS Project Pro:
- Click the "File" item in the top menu.
- Click the "Options" item in the left menu.
- Click the "Display" item in the left menu of the "Project Options" window.
- You can set the type of calendar in the "Calendar Type:" field.
- If you want to show or hide indicators by clicking boxs in the "Show indicators and options buttons for:" block.
- We recommend that you display the enter bar by clicking on the "Enter bar" field.
- If wou want to show the file online status by clicking the "Server status next to name" box.

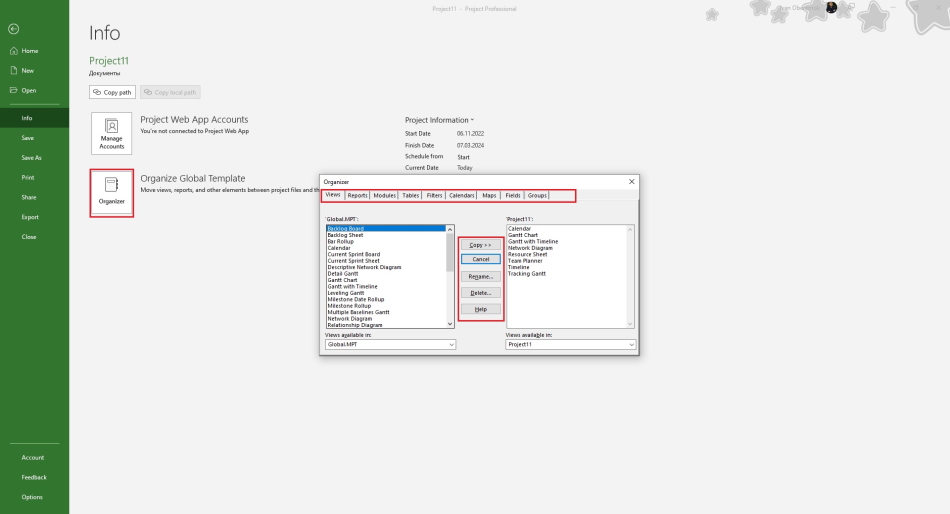
Using an organizer in a file in MS Project Pro
You can exchange project elements between other plans and customize their storage in MS Project Pro.
Steps to use an organizer in a file in MS Project Pro:
- Click the "File" item in the top menu.
- Click the "Info" item in the left menu.
- Click the "Organizer" button.
- Select the type of element in the top of the "Organizer" window.
- Select a file name in the field at the bottom right of the window.
- Select the element name from the list at the right of the window.
- You can remane the element by clicking the "Rename" button.
- You can delete the element by clicking the "Delete" button.
- If you want to copy an element:
- Select a file name in the field at the bottom left of the window.
- Select the element name from the list at the left of the window.
- Click the "Copy >>" button.
- Click the "Cancel" button.
#msprojectpro, #oberemokii, #projectmanagment, #projectintegrationmanagement, #initiatingprocess

Author: Ivan Oberemok
