
Adding the table in the report in MS Project Pro
Contents:
- Add the table in the report in MS Project Pro
- Customize the table in the report in MS Project Pro
- Chat
Add the table in the report in MS Project Pro
You can add any number of tables to a report. You must add separate tables for tasks and resources.
Steps to add a table to a report in MS Project Pro:
- Click the "Report" item in the top menu.
- Create the report.
- Click the "Report Design" item in the top menu.
- Click the "Table" button in the "Insert" block.
- Set the table in the report page.
Customize the table data:
- Click the "Table Desigen" item in the top menu.
- Click the "Table Date" button in the "Show/Hide" group.
- Select the type date in the "Field List" block ("Task" or "Resources").
- Click on the required fields in the "Select Field" box.
- Choose a filter in the "Filter" field.
- Choose a group in the "Group" field.
- Set a tasks level in the "Outline Level" field.
- If you want show the hierarchy, click the "Show Hierarchy" box.
- Choose a field for sort in the "Sort by" field.
For customize the table in the report in MS Project Pro select the table:
Block "Table Style Options"
- Header Row - You can show or hide table titles, click the "Header Row" box.
- Table Row - You can table last rows highlight, click the "Table Row" box.
- Banded Row - You show or hide table rows highlight, click the "Banded Row" box.
- First Column - You can highlight first table column, click the "First Column" box.
- Last Column - You can highlight last table column, click the "Last Column" box.
- Banded Column - You show or hide table columns highlight, click the "Banded Column" box.
Block "Table Style"
- Select a table style, click the "Quick Styles" button.
- Color background table. Click the "Shading" and chhose a color.
- Table effect. Click the "Effects" buton and cjoose the table effect.
Block "WordArt Style"
- Select a characters style, click the "Quick Styles" button.
- Characters color. Click the "Text full" button and choose a color.
- Characters outline. Click the "Text outline" button and choose a outline color.
- Style of Characters. Click the "Text effect" button and choose a characters effect.

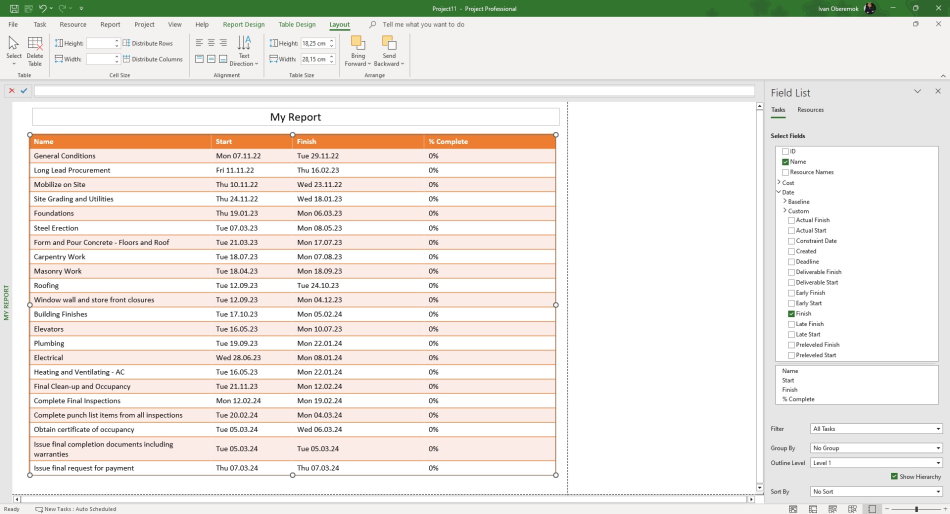
Customize the table in the report in MS Project Pro
For customize the table layout in the report in MS Project Pro select the table:
Block "Table"
- Select Table - you can select all rows and columns, click the "Select" item and choose the "Select Table" subitem.
- Select Column - you can select a current column, click the "Select" item and select the "Select Column" sub-item.
- Select Row - you can select a current row, click the "Select" item and select the "Select Row" sub-item.
Block "Cell Size"
- Height row. Enter the height in the "Height" field. You can automatically adjust column height, click the "Distribute Rows" button.
- Width column. Enter the width in the "Width" field. You can automatically adjust column width, click the "Distribute Columns" button.
Block "Alignment"
- Select the type text alignment.
- Select the position text in cells.
- Select the text direction. Click the "Text Direction" button and select the direction.
Block "Table Size"
- Table height. Enter the table height in the "Height" fied.
- Table width. Enter the table width in the "Wigth" fied.
Block "Arrange"
- Choose the table position in forward (the "Bring Forward" button) or backward (the "Bring Backward" button).
#msprojectpro, #oberemokii, #projectmanagment, #projectcommunicationsmanagement, #planningprocess

Author: Ivan Oberemok
