
Reports in MS Project Pro
Contents:
- Using reports in MS Project Pro
- Adding the text or the shape to the report in MS Project Pro
- Adding images to the report in MS Project Pro
- Chat
Using reports in MS Project Pro
MS Project has the tool for creating project reports. The reports of the project use project data. You can use and customize the system reports or you can create your reports.
System reports are grouped into four groups:
- Dashboards - Overview reports for the project tasks, costs and works.
- Resources - Overview reports for the project resources.
- Costs - Detail overview reports for the project costs.
- In Progress - overview reports for the progress of the project.
- Task Boards - Overview reports for the project sprints.
All your reports will be add to the "Custom" item of the top menu. All your recent reports will be add to the "Recent" item of the top menu.
If you want to create a new report click the "New Report" item of top menu. Choose the start page of your report. We recommend choose the "Blank" page. Or you can choose the system report and customize it.
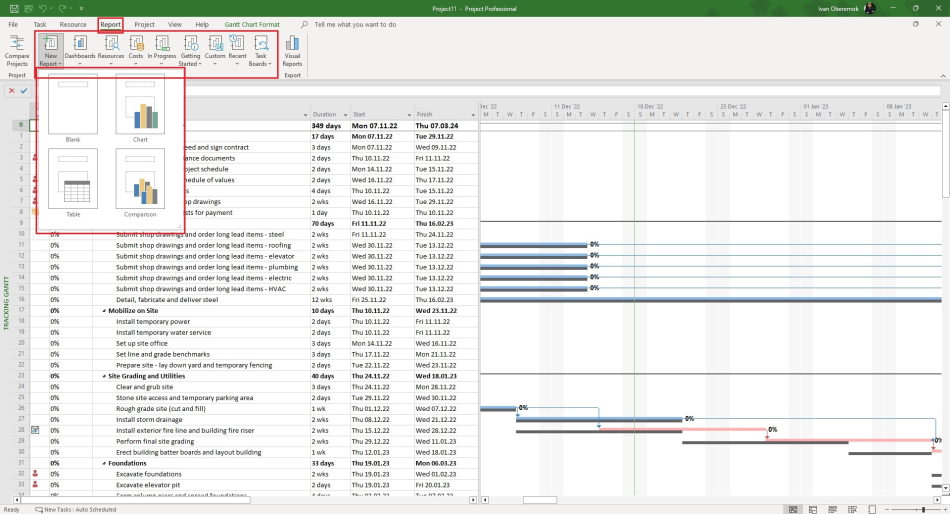
You can add any of the five object types:
- Images - add any images from your computer.
- Shapes - add any shapes.
- Chart - add any chart from project data.
- Table - add any table or field from project data.
- Text Box - add any text.
You can change the name of the report, click the "Rename Report" button. Enter a new name in the "New name for report from" field.
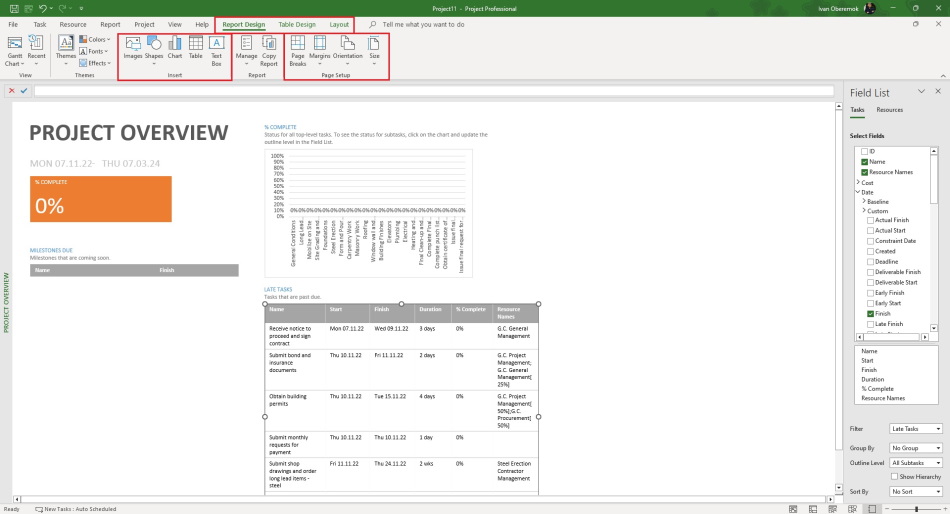
Set page breaks for report pages. Click the "Page Breaks" button.
Set the margins for report pages. Click "Margins" the button. You can choose typical values or set your values.
Set the orientation report pages. Choose the type in the "Orientation" item of the top menu.
Select the size report pages in the "Size" item of the top menu.
Adding the text or the shape to the report in MS Project Pro
The tool for customize texts and shape is same. Steps to customize the text:
- Click the "Report Design" item in the top menu.
- Click the "Text Box" button in the "Insert" block.
- Set the text box in the report and enter the text.
- Click the "Shape Format" item in the top menu.
- Choose the style text in the "Shape Style" block.
- You can set the background color of the text field. Select a color in the "Shape Fill" button.
- You can set the outline type, weight and color of the text field. Customize the outline in the "Shape Outline" button.
- You can set the shape effects of the text field. Customize effects in the "Shape Effects" button.
- You can change the style of each part of text. You must to select the part of text.
- You can change the style in the "WordArtStyles" block.
- You can set the background color of the selected text. Select a color in the "Text Fill" button.
- You can set the outline type, weight and color of the select text. Customize the outline in the "Text Outline" button.
- You can set the text effects of the select text. Customize effects in the "Text Effects" button.
- You can set the position of the text in the "Arrange" block. If you want to move the text forward, click the "Bring Forward" button. If you want to move the text backward, click the "Send Backward" button.
- If you want to rotate the text. Click the "Rotate" button and select a position.
- You can set the heught and width of the text box in the "Size" block.

Adding images to the report in MS Project Pro
You can add a different images in the your report and customize it. Steps to customize the image:
- Click the "Report Design" item in the top menu.
- Click the "Images" button in the "Insert" block.
- Set the images in the report.
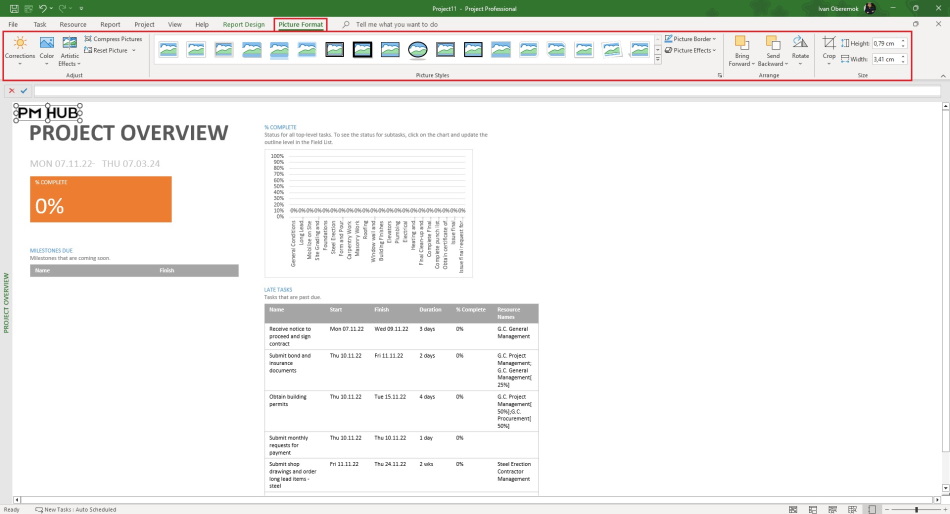
- Click the "Picture Format" item in the top menu.
- You can set the sharpen in the "Corrections" button in the "Adjust" block.
- You can set the brightness in the "Corrections" button in the "Adjust" block.
- You can set the color saturation in the "Color" button in the "Adjust" block..
- You can set the color tone in the "Color" button in the "Adjust" block..
- You can set the recolor in the "Color" button in the "Adjust" block..
- If you want to reset the seting image, click the "Reset Picture" button.
- You can compress the image, click the "Compress Picture" button.
- You can set the image border in the "Picture Style" block.
- You can customize the image border, click the "Picture Border" button.
- You can set the picture effects of the image. Customize effects in the "Picture Effects" button.
- You can set the position of the image in the "Arrange" block. If you want to move the image forward, click the "Bring Forward" button. If you want to move the image backward, click the "Send Backward" button.
- If you want to rotate the image. Click the "Rotate" button and select a position.
- You can set the heught and width of the image in the "Size" block.

Author: Ivan Oberemok
