
Table in MS Project Pro
Contents:
Using tables in MS Project Pro
Information about your project can be displayed in different table. You can se the system tables or make your tables.
MS Project Pro has a lot of tables. Steps to using views in MS Project Pro:
- Click the "View" item of top menu.
- Click the "Table" button in the "Data" block.
- Click on the name of the desired table.
- If you change something in your tables and want to return old customize. Click the "Reset to Default" button.
- You can using more tables and you must click the "More Table..." button.
- You can create your table in MS Project Pro. You must customize any tables and click the "Save Fields as a New Table" button in this menu.

Adding and editing tables in MS Project Pro
You can create your table in MS Project Pro. An easier way to create your own table is to add columns and save it. Once configured, click the "Save Fields as New Table..." item.
Other way, you can copy any system table and customise it. Steps and and edit table in MS Project Pro:
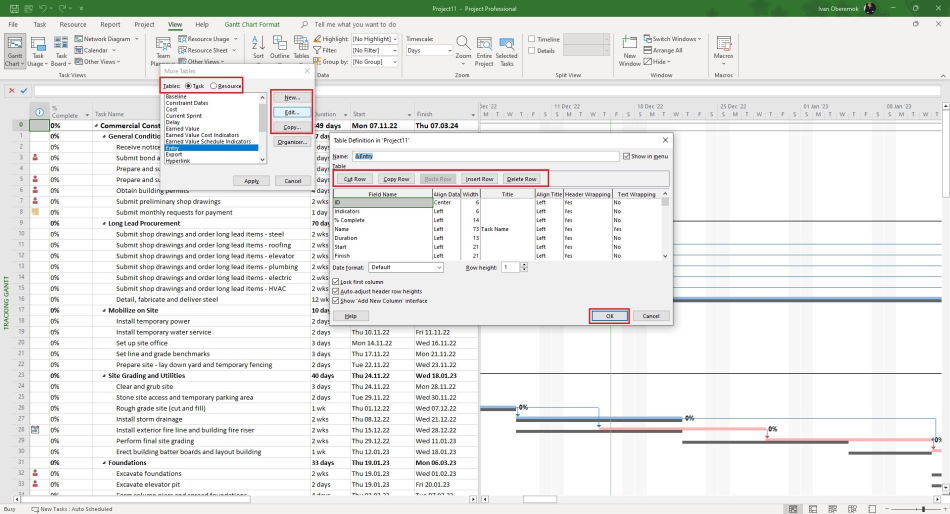
- Click the "More Tables ..." button.
- Choose whether you want to create a table for "Task" or for "Resource" in the "Tables:" block.
- If you want to copy the created table, choose the table and click the "Copy ..." button.
- If you want to change the created table, choose the table and click the "Edit ..." button.
- If you want to create a new table, click the "New ..." button.
- Click the "Apply" button.
Steps to describe a new table in MS Project Pro:
- Enter the name of new table in the "Name:" field.
- Select columns in the "Field Name" field.
- Select the column data align in the "Align Data" field.
- Set the column width in the "Width" field.
- Set the column title in the "Title" field.
- Select the column title align in the "Align title" field.
- If you want to set the title wrapping, set the "Yes" in the "Heander Wrapping" field.
- If you want to set the data wrapping, set the "Yes" in the "Text Wrapping" field.
- If you want to show table in the menu , click the "Show in manu" box.
- You can set special format date in the "Date format:" fieid.
- You can set rows height in the "Row height:" fieid.
- If you want to lock first column, click the "Lock first column" box.
- If you want to set automaic seting the titles height, click the "Auto-adjust header row heights" box.
- If you want to add column "Add New Columns" in the right part. click the "Show Add Column interface" box.
- If you want to show this item in the menu, click the "Show in menu" box.
- Click the "Ok" button.
#msprojectpro, #oberemokii, #projectmanagment, #projectintegrationmanagement, #initiatingprocess

Author: Ivan Oberemok
