
Сurrent period tasks in MS Project Pro
Contents:
- Сurrent period tasks in MS Project Pro
- Showing the progress lines in MS Project Pro
- Showing status tasks in MS Project Pro
- Chat
Сurrent period tasks in MS Project Pro
To control the tasks of the project, you must select the tasks of the current period In MS Project Pro, you can select the tasks using current period with several tools
First tool. Steps to show current period tasks in MS Project Pro:
- Click the title of the "Start" field and select date later than status date.
- Click the title of the "% Complete" field and select select value "100%".
Second tool. Steps to show current period tasks in MS Project Pro:
- Open the "Gantt Chart" view in your plan.
- Click the "View" item in the top menu.
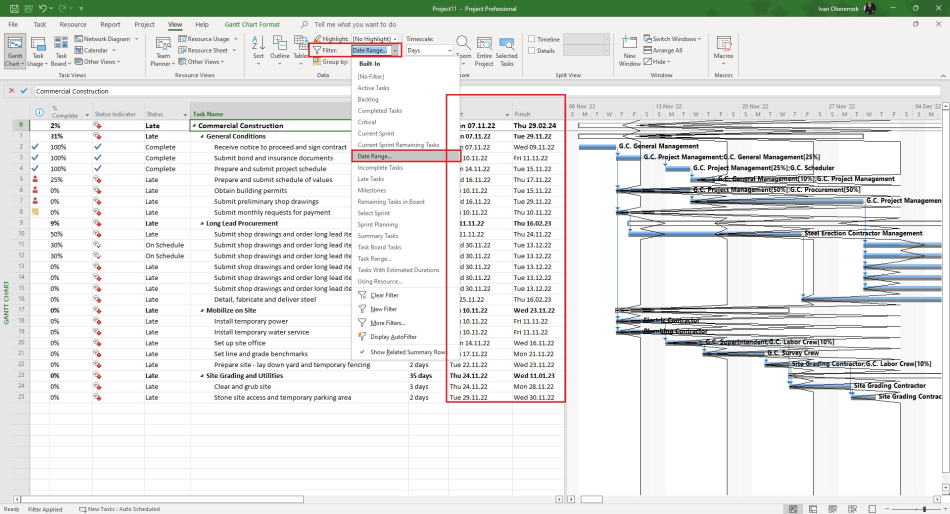
- Choose the "Date Range ..." filter in the "Filter" field in the "Data" block.
- Enter the start and end date of the period.
Showing progress lines in MS Project Pro
You can indicate the tasks of the current period in MS Project Pro using the progress line.
Steps to show progress line in MS Project Pro:
- Open the "Gantt Chart" view in your plan.
- Click the "Gantt Chart Format" item in the top menu.
- Clikc the "Gridliness" button in the "Format" block.
- Choose the "Progress Lines" sumitem.
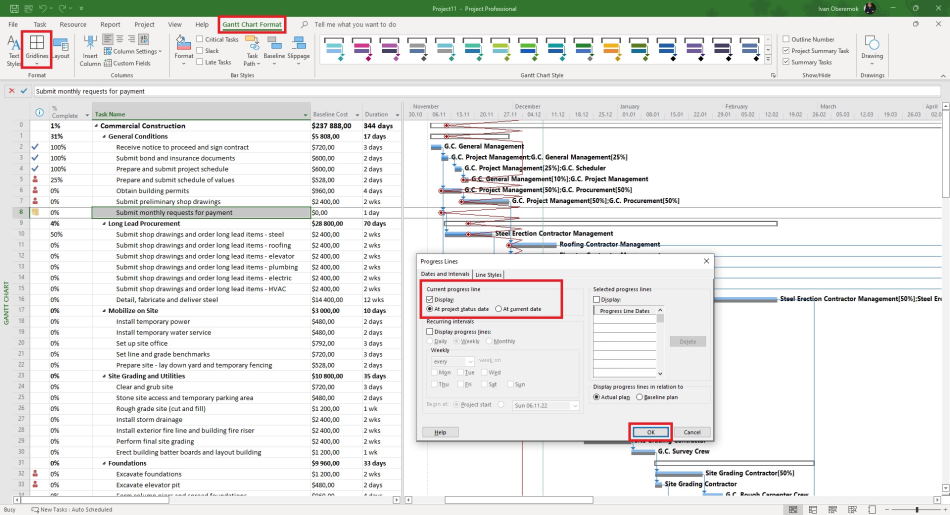
- You can show current progress line with link to status date. When you change the status date, the progress line will also change. Set the "Display" box in the "Current progress line" block. Choose the "At project status date" box.
- If you choose the "At current date" box, the progress line will be link to current date.
- Choose the type of plan in the "Display progress lines in relation to" block.
- Click the "Ok" button.
Steps to show progress line in the recurring intervals in MS Project Pro:
- Open the "Gantt Chart" view in your plan.
- Click the "Gantt Chart Format" item in the top menu.
- Clikc the "Gridliness" button in the "Format" block.
- Choose the "Progress Lines" sumitem.
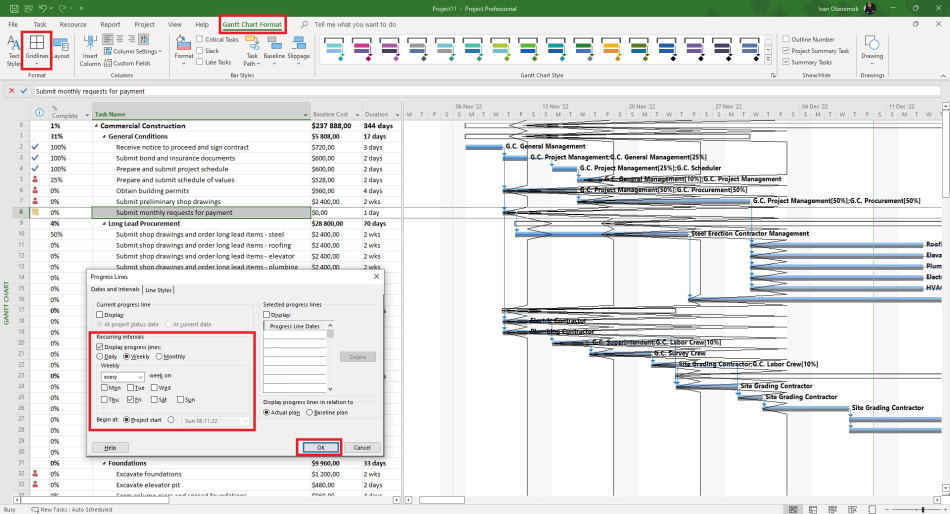
- You can show progress lines in each recuring interval. Set the "Display progress lines" box in the "Recuring intervals" block.
- Choose interval type.
- Set the day in the recurring interval.
- Set the begin date in the "Begin at:" field.
- Choose the type of plan in the "Display progress lines in relation to" block.
- Click the "Ok" button.
Steps to show progress line in the exact date in MS Project Pro:
- Open the "Gantt Chart" view in your plan.
- Click the "Gantt Chart Format" item in the top menu.
- Clikc the "Gridliness" button in the "Format" block.
- Choose the "Progress Lines" sumitem.
- You can show progress lines in the exact date. Set the "Display" box in the "Select progress lines" block.
- Enter the exact dates in the "Progress Line Dates" field.
- Choose the type of plan in the "Display progress lines in relation to" block.
- Click the "Ok" button.
Showing status tasks in MS Project Pro
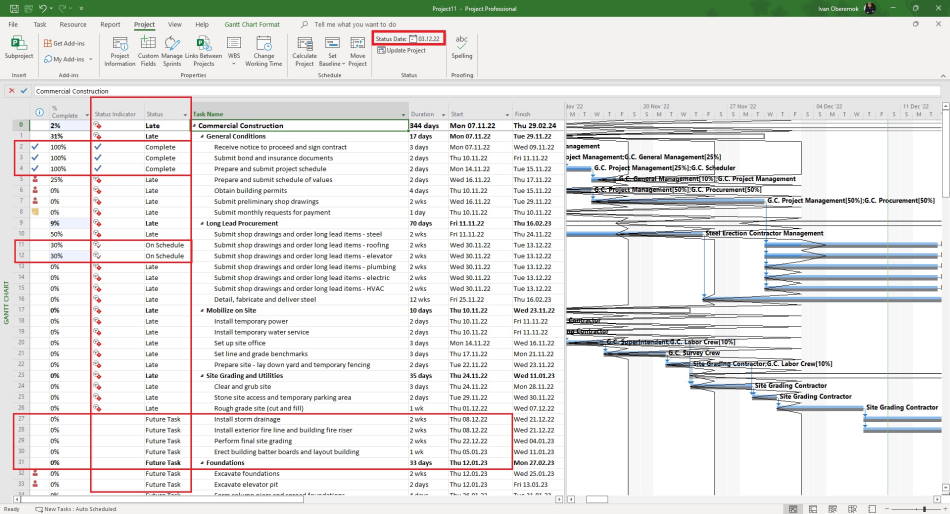
MS Project Pro has columns that show the status of tasks. Each task can have the following statuses:
- "Complate" - Task completed.
- "On Schedule" - Execution of a task according to plan.
- "Late" - Task completed overdue.
- "Future Task" - The task is scheduled for the future period.
Steps to show the status task in MS Project Pro:
- Click the right mouse button and choose the "Insert Column" item.
- Insert columns: "Status Indicator" and "Status"
#msprojectpro, #oberemokii, #projectmanagment, #projectscopemanagement, #executingprocess

Author: Ivan Oberemok
