
Project risks register in MS Project Server
Contents:
- Project risk register in MS Project Server
- Adding project risks to the registry in MS Project Server
- Tracking project issues in MS Project Server
- Add and edit fields describing risks in MS Project Server
- Add and edit views describing risks in MS Project Server
- Chat
Project risk register in MS Project Server
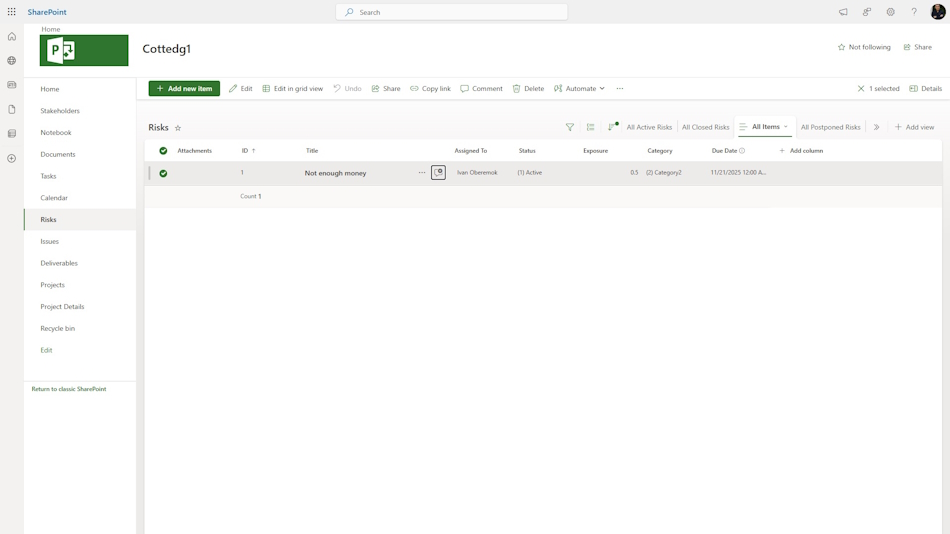
In the MS Project Server system, you can keep a record of risks found and described by team members. To work with this tool, you need to create a project site (how to do this is explained in the article "Creating a Project Site in MS SharePoint"). Go to the project site page and open the "Risks" app. There you can:
- Create a description of a new risk
- Track existing risk
- Manage previously created issues
You can attach:
- Supporting documents (e.g., screenshots, reports).
- Links to related tasks in MS Project.
- Any relevant files that help clarify or resolve the risk.
Link Risks to Project Tasks
- Use the Related Task field or manually reference task IDs in the description.
- This helps track how issues affect specific parts of the project schedule.
Filter and Sort Risks
- Filter by status, priority, or assignee.
- Sort by creation date, due date, or other metadata.
Export and Integrate
- Export the Risks list to Excel for offline analysis.
- Integrate with Power BI for dashboards and visual reports.
- Automate workflows and notifications using Power Automate.
Notifications and Tracking
- Set up alerts for changes in risk status or assignments.
- Use custom views to monitor open, overdue, or high-priority risk.
Adding project risks to the registry in MS Project Server
To create a new risk description, click the "New Item" button. A form will open where you can fill in the necessary fields. After entering the required information, save the request.
Fill in the following fields:
- Title – a clear name for the risk.
- Ower – person who initiated the risk.
- Assigned To – person responsible for resolving the risk.
- Description – detailed explanation of the issue and its impact.
- Probability and Impact – to assess the risk level
- Status – current state (Open, In Progress, Closed).
- Start Date / Due Date – timeline for resolution.
- Related Task / Category – optional links to project tasks or categories.

Tracking project issues in MS Project Server
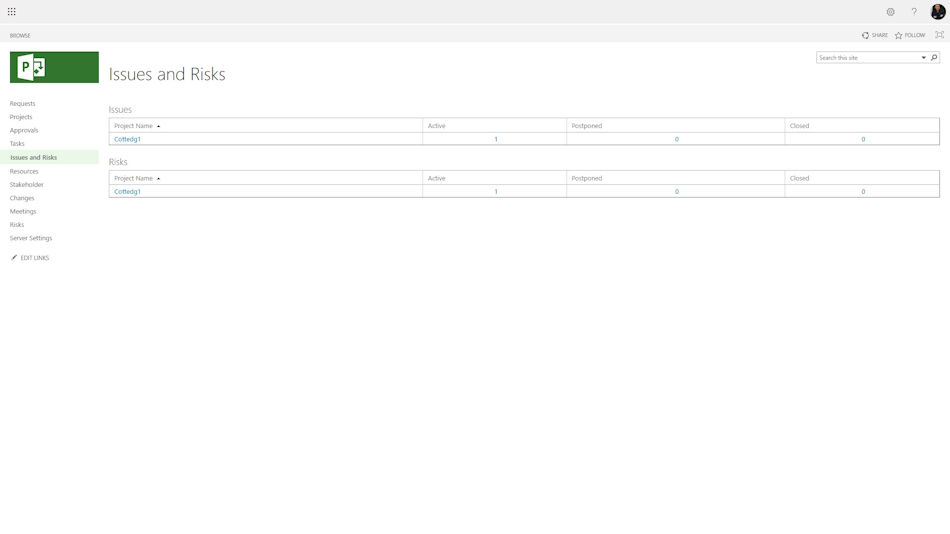
In Microsoft Project Server, users can track and manage riskss assigned to them directly from the Project Web App (PWA) home page. This centralized view helps team members stay informed about problems across multiple projects and take timely action.
Each company employee can log into the system under their account and go to the “Issues and Risks” section, where all change requests (questions) assigned to them will be displayed.
Locate the “Riscks” Section
- Look for a web part or link labeled “My Ricks”, “Assigned Risks”, or “Project Site Risks”.
- This section displays a list of all issues assigned to you across different project sites.
Working with Assigned Risks
Once you’ve located your risks, you can perform the following actions:
View Risk Details
- Click on the risk title to open its full record.
- Review the description, priority, status, due date, and related task or project.
Update Risk Status
- Change the status (e.g., Open → In Progress → Closed).
- Add comments or notes to document progress.
- Reassign the risk if needed (depending on permissions).
Attach Files or Link Tasks
- Add supporting documents or screenshots.
- Link the risk to a specific task using the “Add Related Item” feature.
Sort and Filter
- Use built-in filters to view risks by project, priority, or due date.
- Sort by status to focus on unresolved or overdue items.
Add and edit fields describing risks in MS Project Server
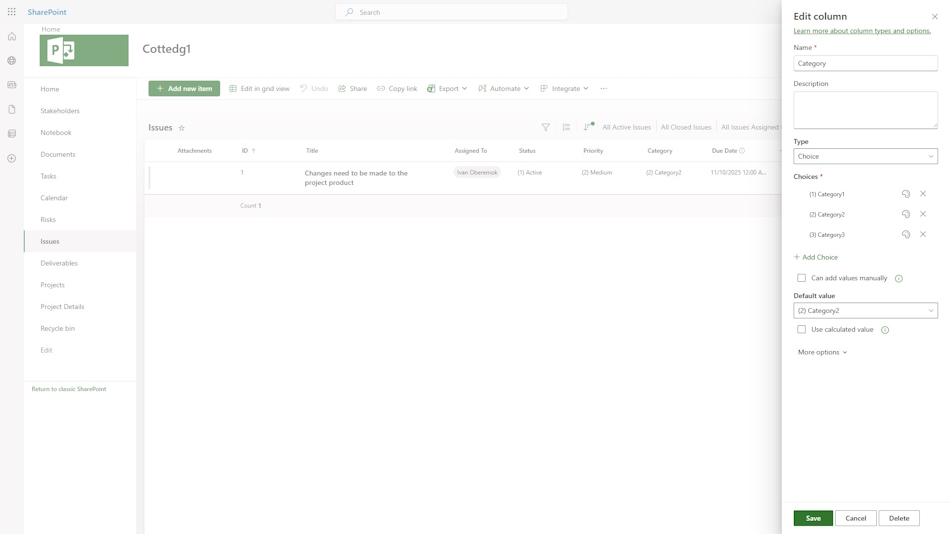
You can customize the risk registry for your project. For example, you can change the values in the category field. Add or change values depending on the specifics of your project.
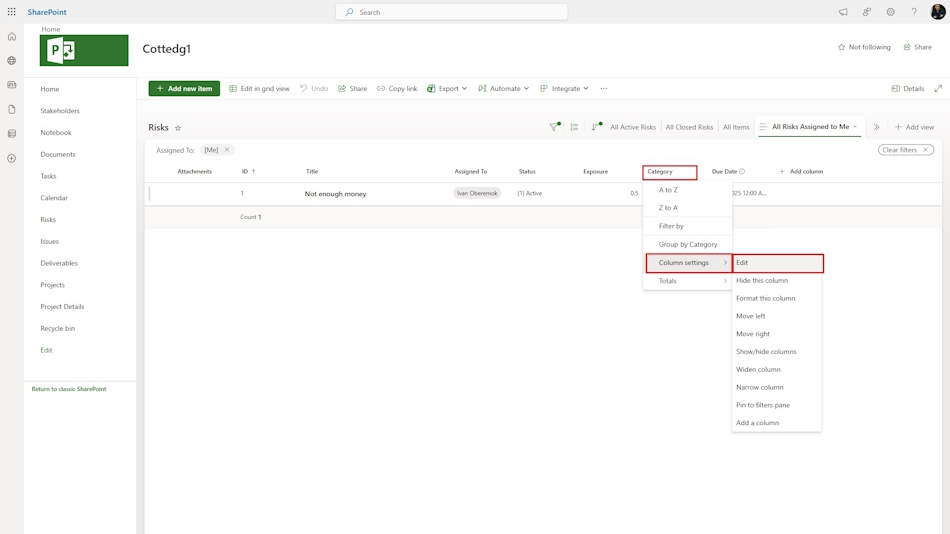
- Select the column you want to edit. For example, “Category.”
- Click on the arrow next to the name and select “Column Settings”
- In the menu that opens, select “Edit”
- In the window that opens, change the category names in the Choices block.
- After editing, click “Save” at the bottom of the page.
Add and edit views describing risks in MS Project Server
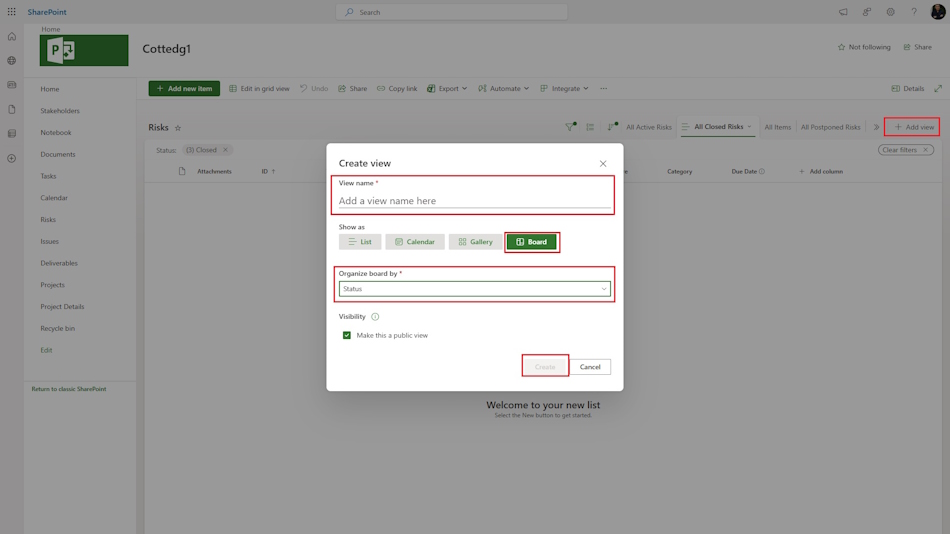
In the risk registry, you can also modify or create your own view. In this view, you can configure the format of information presentation that is convenient for you.
To create your own view:
- Click on the “Add view” button.
- Specify the name of the view in the “View name” field.
- Select the view type. You can create different types of views. Try using the calendar or board view.
- To create, click the “Create” button.
To edit the view of risks:
- Click on the arrow next to the view name.
- Select “Edit current view”
- In the window that opens, select the columns for the view.
- Configure the view filter in the “Filter” block.
- Configure the grouping in the “Group” block.
- To save, click the “Ok” button.
- You can also create a new view based on the current one. To do this, click on the menu and select “Save view as”.


Author: Ivan Oberemok
