
Adding project information in MS Project Pro
Contents:
- Adding project information in a plan in MS Project
- Adding advanced properties in a plan in MS Project
- Chat
Adding project information in a plan in MS Project
Properly configuring project settings is the foundation upon which any schedule is built. Errors at this stage can lead to incorrect critical path calculations and resource overallocation. In this article, we will detail how to set both basic and advanced project properties to ensure your plan remains robust and professional.
Setting up basic project information determines how MS Project calculates the schedule: whether it calculates from the start date forward or from the finish date backward.
Step-by-Step Instructions (Corrected):
- Click the "Project" tab in the top ribbon menu.
- In the "Properties" group, click the "Project Information" button.
- In the dialog box that appears, set the project's start date in the "Start date" field.
- Note: By default, all new tasks will be scheduled to begin on this date unless specific dependencies or constraints are added later.
- Define the scheduling logic in the "Schedule from" field. Two options are available:
- Project Start Date: Calculations run forward (the most common and recommended method).
- Project Finish Date: Calculations run backward from a fixed deadline (used for "just-in-time" scheduling).
- Select the base calendar for the project in the "Calendar" field. Usually, this is "Standard," but if your organization utilizes a 6-day work week or specific national holidays, ensure the correct custom calendar is selected here.
- Set the project "Priority" (ranging from 0 to 1000). This value is crucial when using the "Resource Leveling" feature across multiple projects, as it tells the software which project should receive resources first.
- Click the "OK" button to apply the settings.
Why Is This Important?
Many novice managers overlook the calendar selection. If you assign resources to tasks but fail to set the correct project calendar (e.g., forgetting to account for public holidays), the software will calculate an unrealistic finish date. Additionally, pay close attention to the "Current Date" and "Status Date" fields; these are essential for tracking progress and generating accurate "Earned Value" reports.

Adding advanced properties in a plan in MS Project
While basic information is enough for scheduling calculations, adding advanced properties (metadata) is necessary for high-quality reporting and navigating large project portfolios.
Step-by-Step Instructions for Metadata (Corrected):
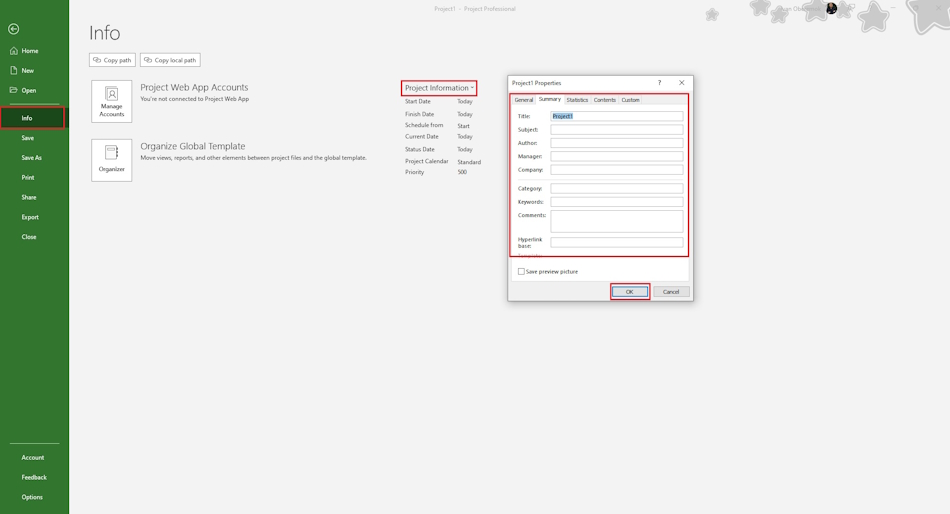
- Click the "File" tab in the top-left corner of the application.
- In the "Info" section, look to the right side and find the "Project Information" dropdown menu.
- Select "Advanced Properties" from the list.
- In the properties window, navigate to the "Summary" tab. Here, you should fill in the following fields:
- Title: The official name of the project.
- Author: The name of the project manager responsible for the file.
- Manager: The name of the supervisor, sponsor, or lead stakeholder.
- Company: Your organization or department name.
- Keywords: Tags for quick searching within a project server or local archive.
- Click the "OK" button to save.
The Role of Advanced Properties in Reporting
Filling out advanced properties is a hallmark of professional planning. These data points are automatically pulled into:
- Print Layouts: If you print the Gantt chart, the "Title" and "Author" will be displayed in the headers or footers.
- Visual Reports: MS Project’s built-in reporting tools use the "Title" field to format cover pages and summary dashboards.
- System Integration: When publishing to Project Online or Project Server, these fields act as filters, allowing executives to group and analyze projects by department or manager.
Pro Tips for Effective Configuration
- Avoid scheduling from the Finish Date unless mandatory. This method applies "As Late As Possible" constraints to all tasks, which eliminates "Float" (Slack) and makes it nearly impossible to analyze the critical path effectively.
- Verify the Status Date. When you begin entering actual work performed, ensure your Status Date is set. Without this, the software cannot accurately distinguish between completed work and work that is simply overdue.
- Resource Calendar Precedence. Remember that while the Project Calendar sets the general work week, an individual Resource Calendar (e.g., for a specific employee’s vacation) will override the project settings for any task assigned to that person.
Taking two minutes to fill in this information at the start saves hours of troubleshooting and manual formatting later in the project lifecycle.

Author: Ivan Oberemok
