
Setting a fact by a user in MS Project Server
Contents:
- Setting up the view to set a fact by a user in MS Project Server
- Setting a fact by a user in MS Project Server
- Chat
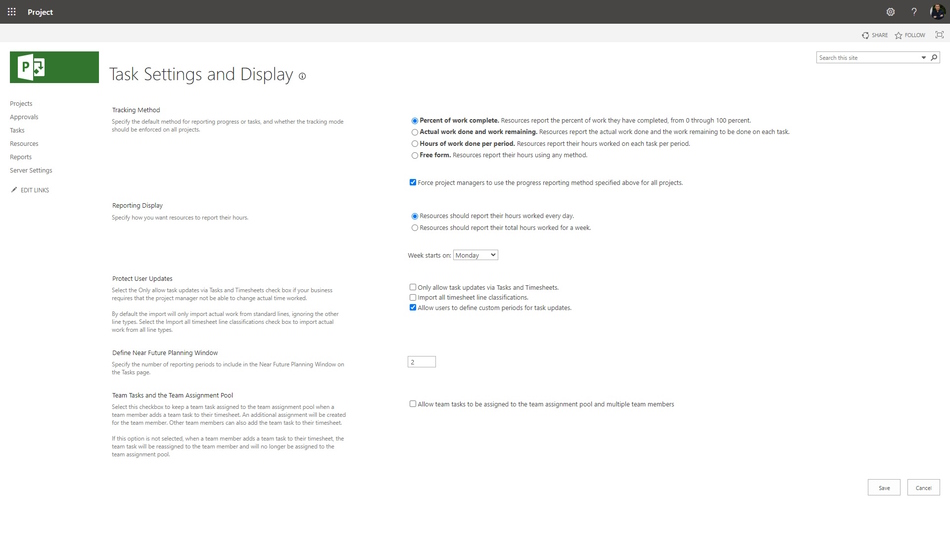
Setting up the view to set a fact by a user in MS Project Server
Steps to set up the view to set a fact by a user in MS Project Server:
- Click the "Server Setting" item in the left menu.
- Click the "Task Settings and Display" link in the "Time and Task Management" block.
- Choose the tracking method in the "Tracking Method" block.
- If you want project managers to collect facts only through tools MS Project Server, click the "Force project managers to use the progress reporting method specified above for all projects" box.
- Choose the type of reporting
- Once a day. Click the "Resources should report their hours worked every day" box.
- Once a week. Click the "Resources should report their total hours worked for a week" box.
- Set the week starts in the "Week starts on:" field.
- If you want to allow users to update tasks only via Task, click the "Only allow task updates via Tasks and Timesheets" box,
- If you want to import all timesheet line classifications, click the "Import all timesheet line classifications" box.
- If you want to allow users to define custom periods for task updates, click the "Allow users to define custom periods for task updates" box.
- Set the number of reporting periods to include in the Near Future Planning in the "Define Near Future Planning Window" block.
- If you want a team member to take tasks from assignment pool, click the "Allow team tasks to be assigned to the team assignment pool and multiple team members" block.
- To save click the "Save" button.
Setting a fact by a user in MS Project Server
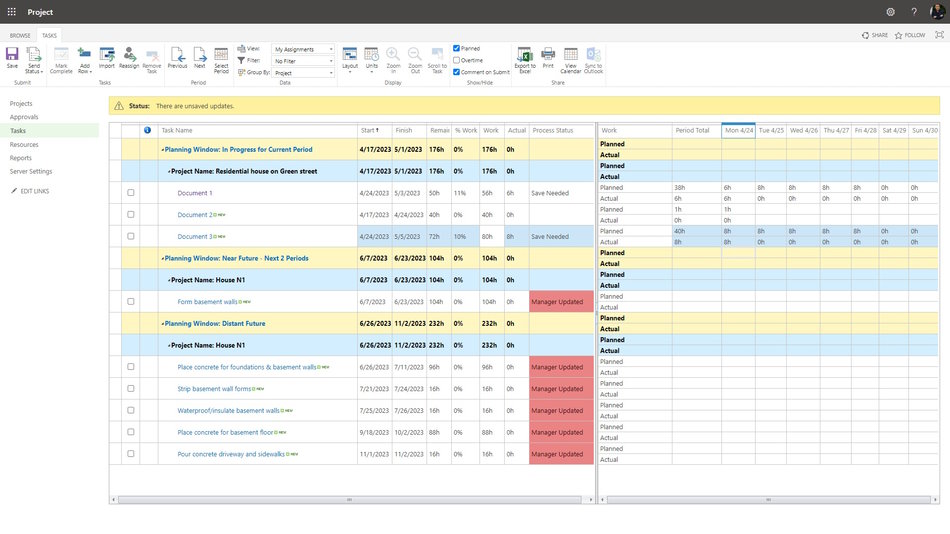
Each user can set the fact that his tasks or the tasks of his resources are completed.
Steps to set a fact by a user in MS Project Server:
- Click the "Task" item in the left menu.
- Choose the period in the "Period" block.
- To show the plan work click the "Planned" box in the "Show/Hide" block.
- If you want to enter overtime, click the "Overtime" box in the "Show/Hide" block.
- You can change the start date in the "Start" field.
- You can change the plan work in the "Work" field.
- You can mark task as completed, select tasks and click the "Mark Complete" button in the "Tasks" block.
- You can enter the task complete percent in the "% Work" field.
- You can enter the task actual work in the "Actual Work" field.
- You can enter the task actual work in the period in the "Period Total" field.
- You can enter the task actual work in a day in the date field.
- After entering, save the data, click the "Save" button in the "Submit" block.
- After entering, you can send data, click the "Send Status" button in the "Submit" block.
#projectportfoliomanagement, #projectresourcemanagement, #executingprocess, #msprojectserver, #oberemokii

Author: Ivan Oberemok
