
Creating enterprise specialists in MS Project Server
Contents:
- Creating enterprise material resources in MS Project Server
- Description of enterprise material resources in MS Project Pro
- Chat
Creating enterprise specialists in MS Project Server
In MS Project Pro you can describe the following types of specialists:
- Specialists type. The resource is used to describe the type of work resources needed to implement the tasks. Such a resource is described using a generic work resource.
- Specialist group. The resource is used to describe group of specialist how has same skills. The number of specialist in the group would be indicated in the "Max" column.
- Specialist. The resource is used to describe one specialist with unic the list of skills.
Steps to create enterprise specialists in MS Project Server:
- Open MS Project Server.
- Click the "Resources" item in the left menu.
- Click the "RESURCES" item in the top menu.
- Click the "New" button in the "Resources" block.
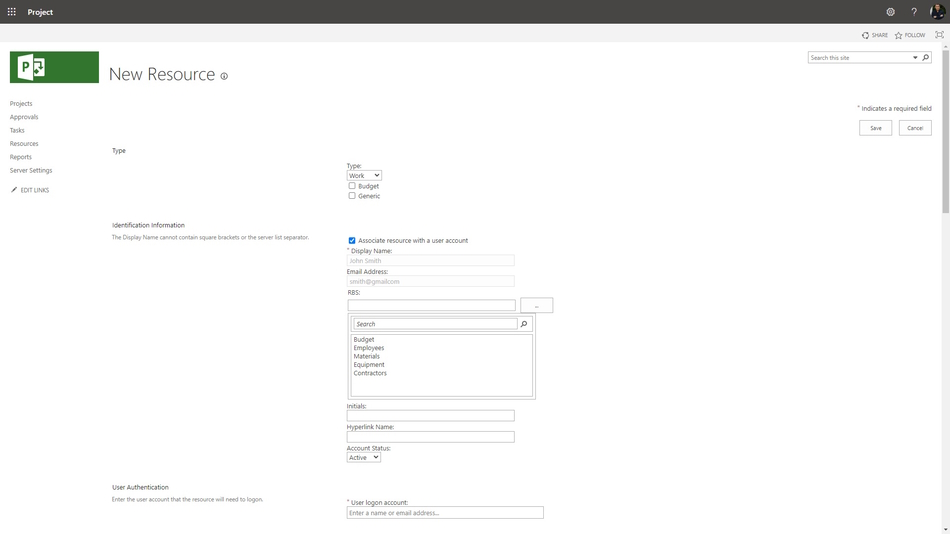
- Choose the "Work" in the field "Type".
- If you click the "Generic" box you will describe the generic resource.
- Enter the specialist name in the field "Display Name".
- Enter the specialist email in the field "Email Address:".
- Choose the "Employees" in the "RBS:" field.
- Enter the specialist initials in the field "Initials:".
- Or
- You can associate specialist with a user account, click the "Associate resource with a user account" box.
- Enter the user login in the "User logon account:" field.
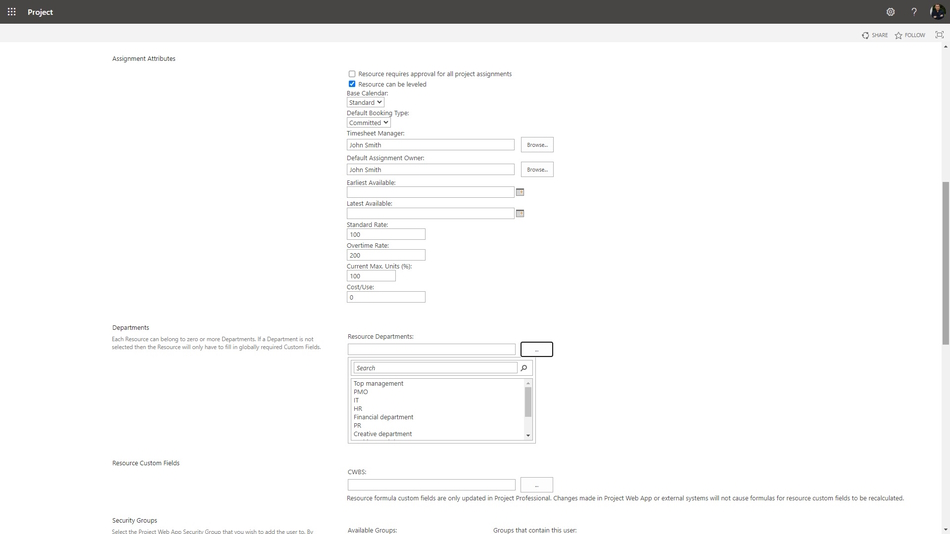
14. If project manager must approve the specialist assign, click the "Resource requires approval for all project assignments" box.
15. If project manager can't level the specialist assign, click the "Resource can be leveled" box.
16. You can set up the specialist calendar in the "Base Calendar:" field.
17. Set up the specialist booking type in the "Default Booking Type:" field.
18. Select the username that will approval the fact of that the specialist was used in the "Timesheet Manager:" field.
19. Select the username that will enter the fact that the specialist was used in the "Default Assignment Owner:" field.
20. Enter the earlest available date of the specialist in the "Earliest Available:" field.
21. Enter the latest available date of the specialist in the "Earliest Available:" field.
22. Enter the specialist standard rate in the "Standard Rate:" field.
23. Enter the specialist overtime rate in the "Overtime Rate:" field.
24. Enter the percentage of participation of a specialist in the "Current Max. Units (%):" field.
25. Enter the specialist use cost in the "Cost/Use:" field.
26. Choose the material resource department name in the "Resource Departments:" field.
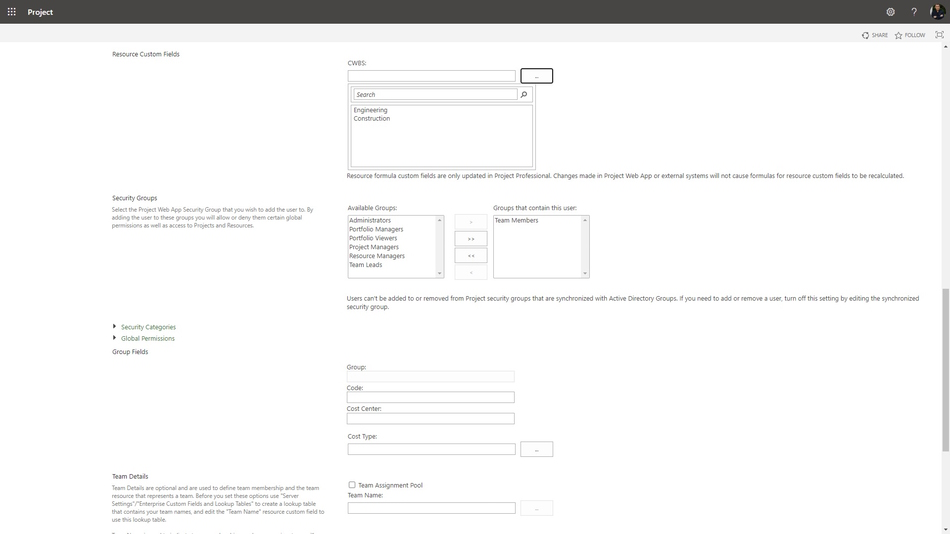
26. You can set the security group of the specialist in the "Security Group" block.
27. You can set the specialist code in the "Code:" field.
28. You can set the specialist cost center in the "Cost Center:" field.
29. You can set the specialist cost type in the "Cost type:" field.
30. You can set the team of the specialist in the "Team Name:" field.
31. To save click the "Save" button.
Description of enterprise specialists in MS Project Pro
Steps to description of enterprise specialists in MS Project Pro:
- Open MS Project Server.
- Click the "Resources" item in the left menu.
- Click the "RESURCES" item in the top menu.
- Click the "Open" button in the "Resources" block.
- Duble-click the specialist.
- Click the "Costs" tub.
- Set the work type of specialists. System use the "A" type for default.
- You can add a new rates in the "Cost rate tables" table :
- Enter the rate start date in the "Effective Date" column.
- Enter the rate value in the "Standard Rate" column.
- Enter the per use cost in the "Per Use Cost" column.
- You can set accrue in the "Cost accual:" field.
- Click the "Notes" tub.
- In the Notes text box, enter your note text. It is possible to format the entered text by clicking on the appropriate buttons "Format Font", "Align left", "Align center", "Align right", "Bulleted list".
- In the "Resource Infromation" window, on the "Notes" tab, click the "Insert Object" button. You can add a description of the material resource or a link to a file with a description.
- In the "Insert object" window, click the "Create from file" button. Enter the full name of the file (including the path) you want to attach to the resource, or click the Browse button and browse for your file.
- To add an object to a project file, select the "Link" check box. Keep only references to this object.
- To display the object as an icon, select the "Display As Icon" checkbox:
- Click the "Save" button and close MS Project Pro.


Author: Ivan Oberemok
