
Add the budget cost resource in MS Project Pro
Contents:
Create budget cost resources in MS Project Pro
The project budget is determined by the company's management. Financing of the project can be carried out from different budgets of the company. Part of the money may come from external investors, part from the internal budgets of the company.
Receipt can be carried out in different periods in different volumes. The project budget is used by the project manager to plan the costs and schedule of the project.
The budget planning process is carried out in several stages:
- Get a budget plan for the project.
- Create budget resources in the plan.
- Assign budget resources to the project task.
- Set the budget cost amount for each resource
- Specify the amount over time.
If you have described a corporate budget resource, it can be assigned in all projects published in the system.
Steps to create budget cost resources in the Project:
- Click the button "Grantt Chart" in the top menu in the item "Task".
- Choose the item "Resource Sheet".
- Enter the name resource in the field "Resource Name".
- Set the "Cost" value in the "Type" field.
- Set the "Budget" value in the in the field "Group".
- Set the "Yes" value in the in the field "Budget".

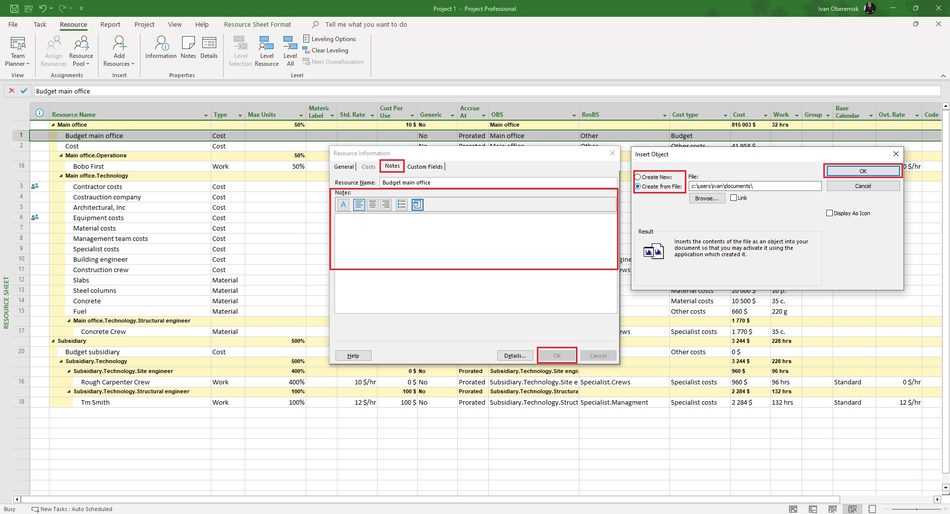
Steps to add note of the budget cost resource in MS Project Pro:
- Click the "Notes" tub.
- In the Notes text box, enter your note text. It is possible to format the entered text by clicking on the appropriate buttons "Format Font", "Align left", "Align center", "Align right", "Bulleted list".
- In the "Resource Information" window, on the "Notes" tab, click the "Insert Object" button. You can add a description of the specialist or a link to a file with a description.
- In the "Insert object" window, click the "Create from file" button. Enter the full name of the file (including the path) you want to attach to the resource, or click the Browse button and browse for your file.
- To add an object to a project file, select the "Link" check box. Keep only references to this object.
- To display the object as an icon, select the "Display As Icon" checkbox:
- Click the "Custom Fields" tub in the "Resource Information" window.
- Enter values in the custom column.
- Click the "Ok" button.

#msprojectpro, #oberemokii, #projectmanagment, #projectcostmanagement, #initiatingprocess

Author: Ivan Oberemok
