
Printing a plan of the project in MS Project Pro
Contents:
- Printing the current view in MS Project Pro
- Setting print options in MS Project Pro
- Setting up pages in MS Project
- Chat
Printing the current view in MS Project Pro
In You can print reports and the current view. The printed view includes the information displayed on the screen.
Steps to print information:
- Click the item "File" on the top menu.
- Click the item "Print" on the left menu.
- On the left side of the screen are the print options, on the right side is a preview of the pages to be printed.
- You can select a printer to print from the list in the "Printer" field.
- You can make basic settings in the block. You can choose how many pages and what period of the project to print.
- You can choose the size and layout of the sheet.
- To customize pages, click the "Page Setup" link.

Setting print options in MS Project Pro
Steps to set print options:
- Click the item "File" on the top menu.
- Click the item "Print" on the left menu.
- To customize pages, click the "Page Setup" link.
- To configure the printing of views, click on the tab "View".
- To print all columns of the current view set the "Print all sheet columns" checkbox.
- To print a limited number of columns in the current view set the "Print first" checkbox. And set the number of columns.
- To print task notes of the current view set the "Print notes" checkbox.
- To avoid printing blank sheets, unset the "Print blank pages" checkbox.
- To print the timescale at the bottom of the page set the "Fit timescale to end of page" checkbox.
You can customize the display of the legend on all pages of the project
You can change the report to fit corporate standards or make it more readable. MS Project makes it easy to set margins, headers and footers and place information on the page. In footers and legends, you can type or paste text, add project information (for example, project goal, plan author name, keywords), document information (for example, page number, date, time, and file name), and insert graphics Images. You can format the text displayed on headers and footers and legends. The header can contain up to five lines of information, the footer and legend can contain up to three lines. You can also change the width of the legend from 0 to 5 inches.
Steps to set print legend:
- To configure the legent, click on the tab "Legend".
- In block "Legend on:" set pages for showing the legend.
- You can set the width of legend in 'Width:" field.
- You can set the font of legend text push the "Legend Labels" button.
- Choose the pat of page press to the tab: "Left", "Center" and "Right".
- You can insert code in the legend that will display different parameters (example: print date, print time).
- You can add into the legend diferent general fields of the file and fields of plan. Choose the name of field and press the button "Add".
- Click the "Ok" button.
Steps to set print header or footer:
- To configure the legent, click on the tab "Heater" or "Footer".
- Choose the pat of page press to the tab: "Left", "Center" and "Right".
- You can insert code in the legend that will display different parameters (example: print date, print time).
- You can add into the legend diferent general fields of the file and fields of plan. Choose the name of field and press the button "Add".
- Click the "Ok" button.

Setting up pages in MS Project
Gener print settings are the same as other applications Microsoft.
Steps to set page margins:
- To configure the legent, click on the tab "Margins".
- In block "Borders around" set pages for showing the legend.
- You can set the width of legend in 'Width:" field.
- You can set the font of legend text push the "Legend Labels" button.
- Enter the page width in the box: "Top:", "Left:", "Bottom:", and "Right:".
- Click the "Ok" button.
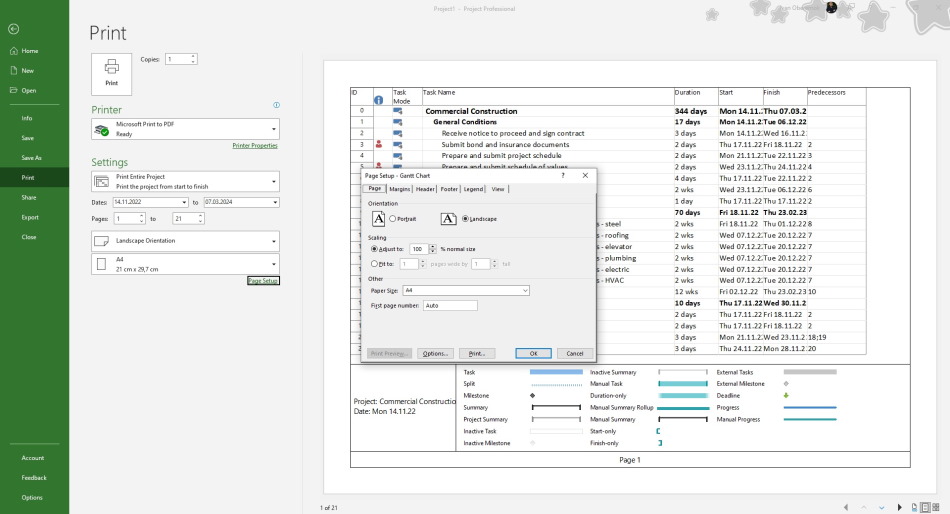
Steps to set page setting:
- To configure the legent, click on the tab "Page".
- In the "Orientation" block, set the page orientation.
- In the "Scaling" block, set the page scale.
- You can set the print size in 'Adjust to:" field or you can set the page count in "Fit to:"
- You can set the page size in the "Other" block.
- Click the "Ok" button.

Author: Ivan Oberemok
